> For the complete documentation index, see [llms.txt](https://help.tellius.com/llms.txt). Markdown versions of documentation pages are available by appending `.md` to page URLs; this page is available as [Markdown](https://help.tellius.com/settings/users-and-access/groups.md).
# Groups
Groups let you manage access for many people at once. Instead of configuring each user individually, you set roles, data policies, and filters on a group, and everyone in it inherits them.
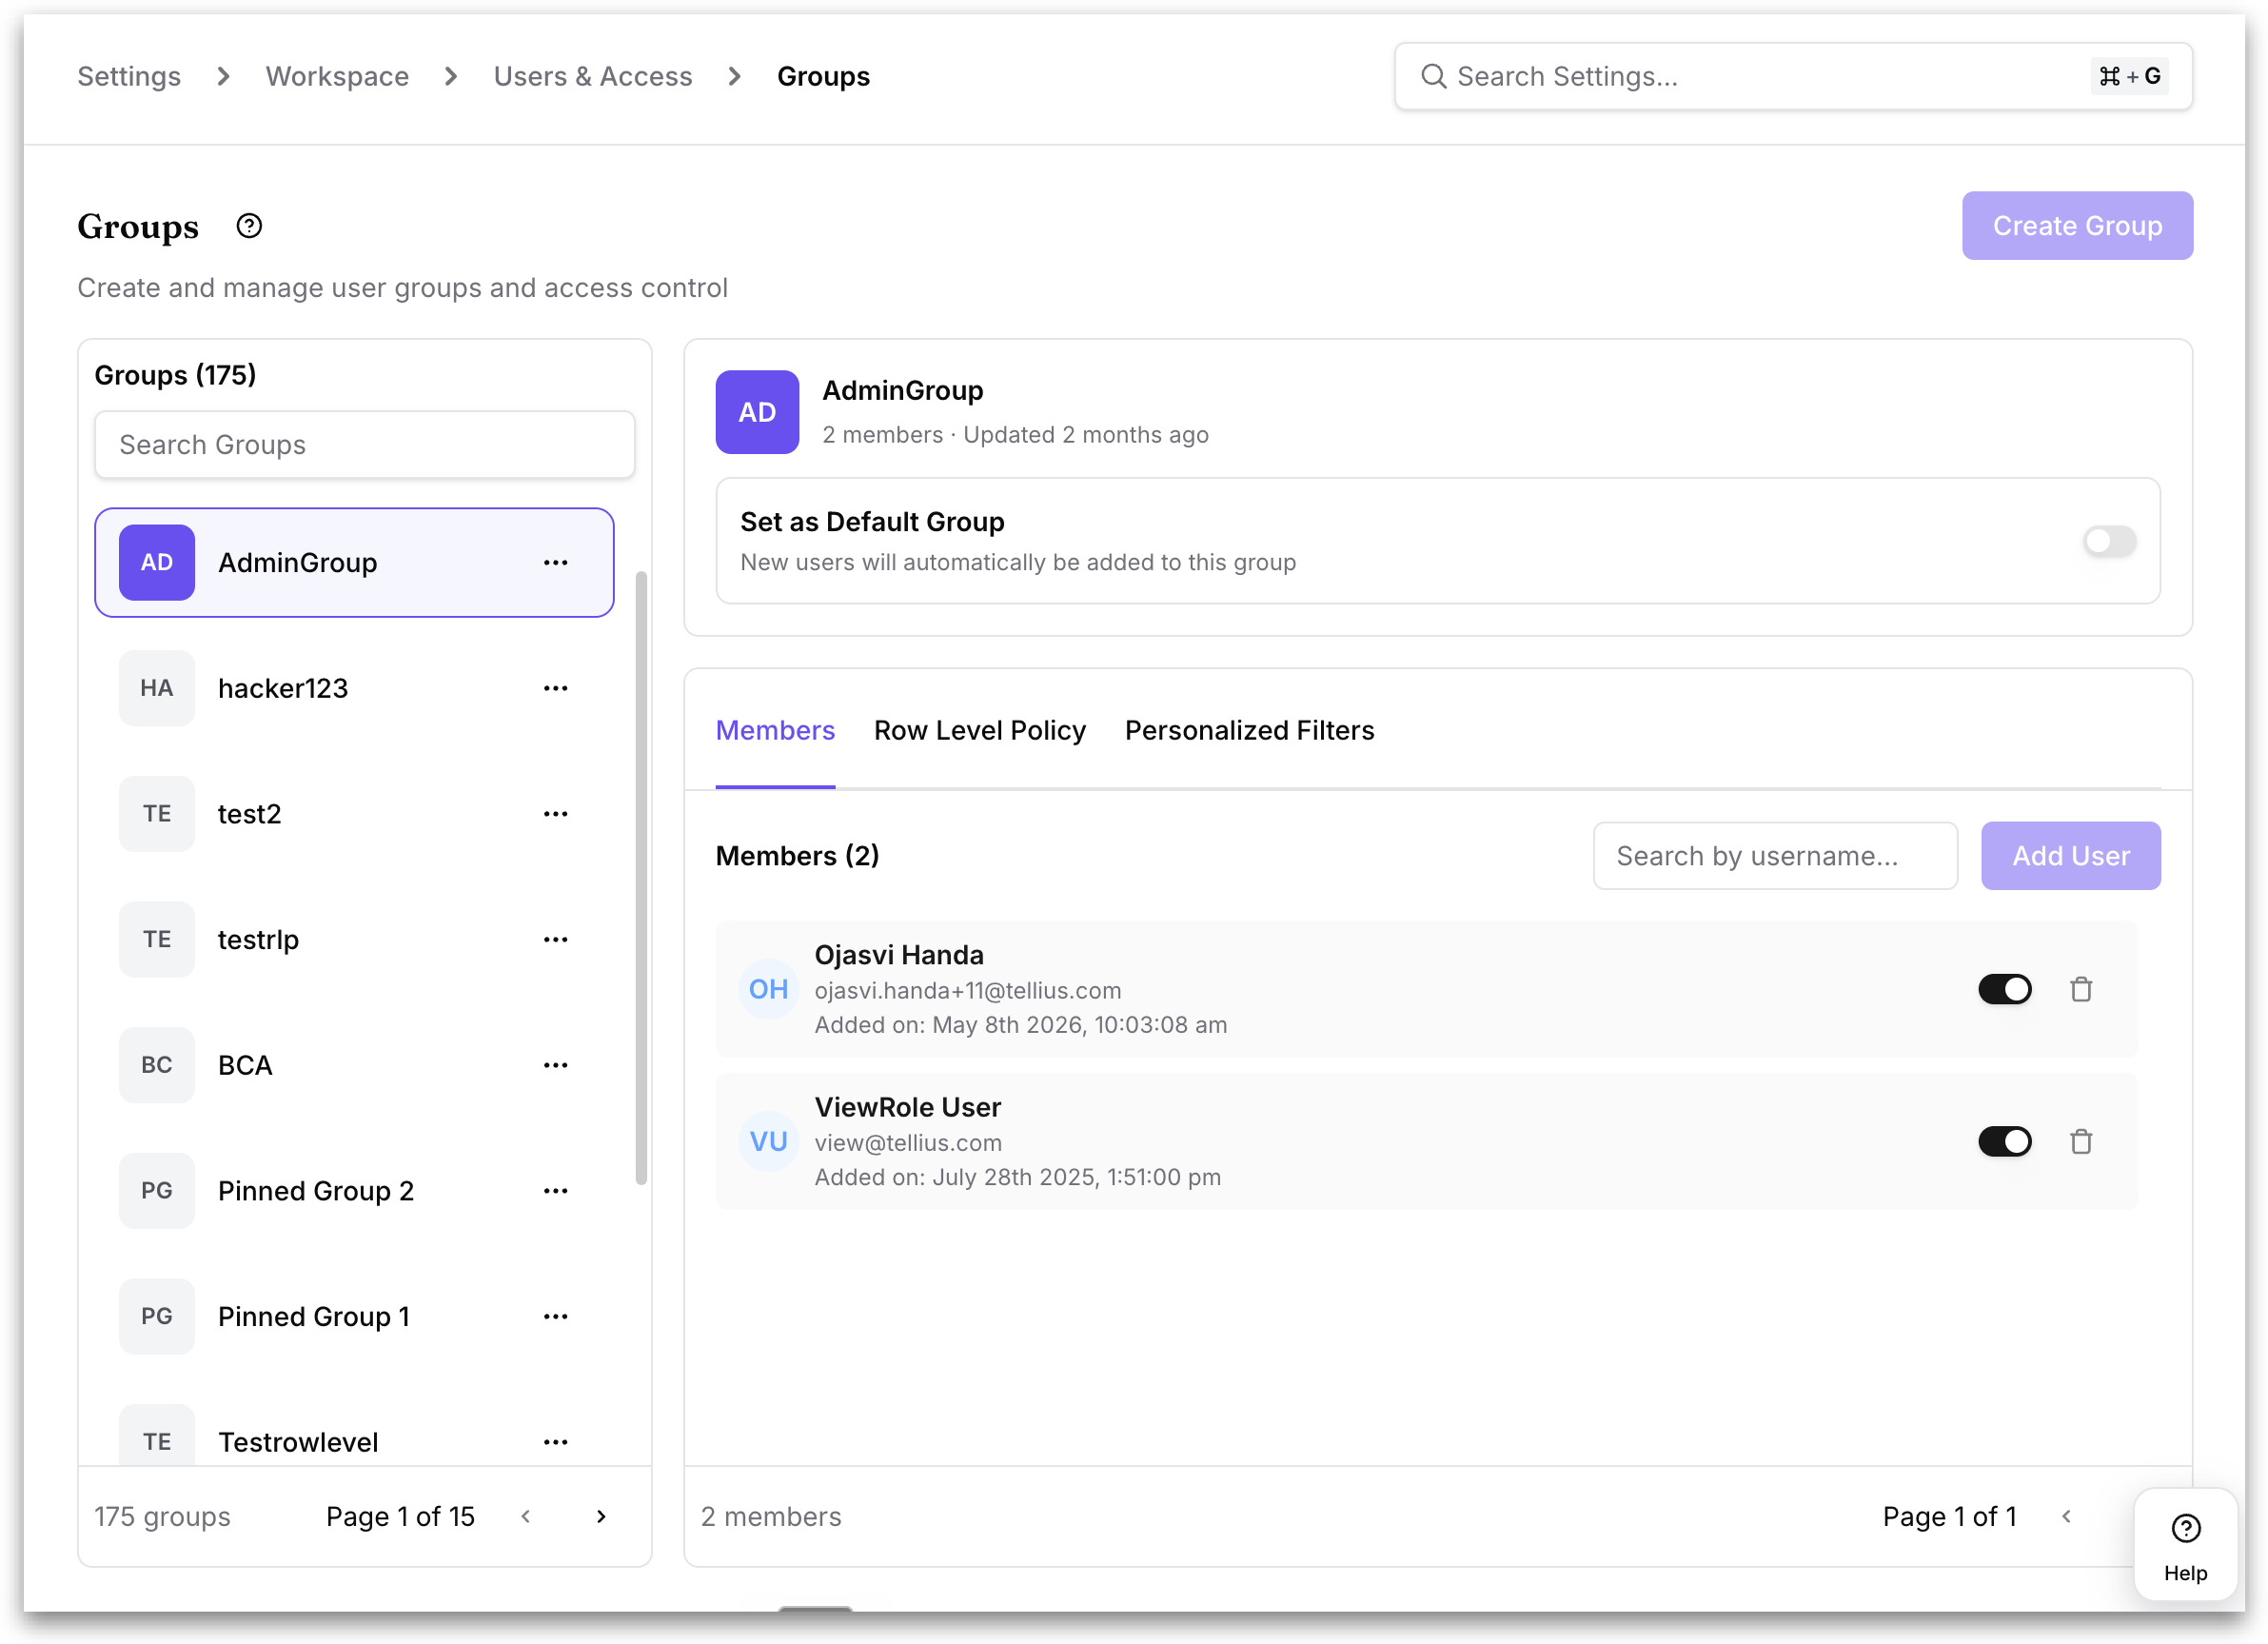
When you select a group in the left panel, the top of the right panel shows the group's avatar and name, how many members it has, and how recently it was updated.
Directly below the header is the **Set as Default Group** toggle. When this is on, every newly created user account is added to this group automatically, so they can immediately access the content shared with the group. Only one group at a time can be the default; turning the toggle on for a different group automatically turns it off for the previous one.
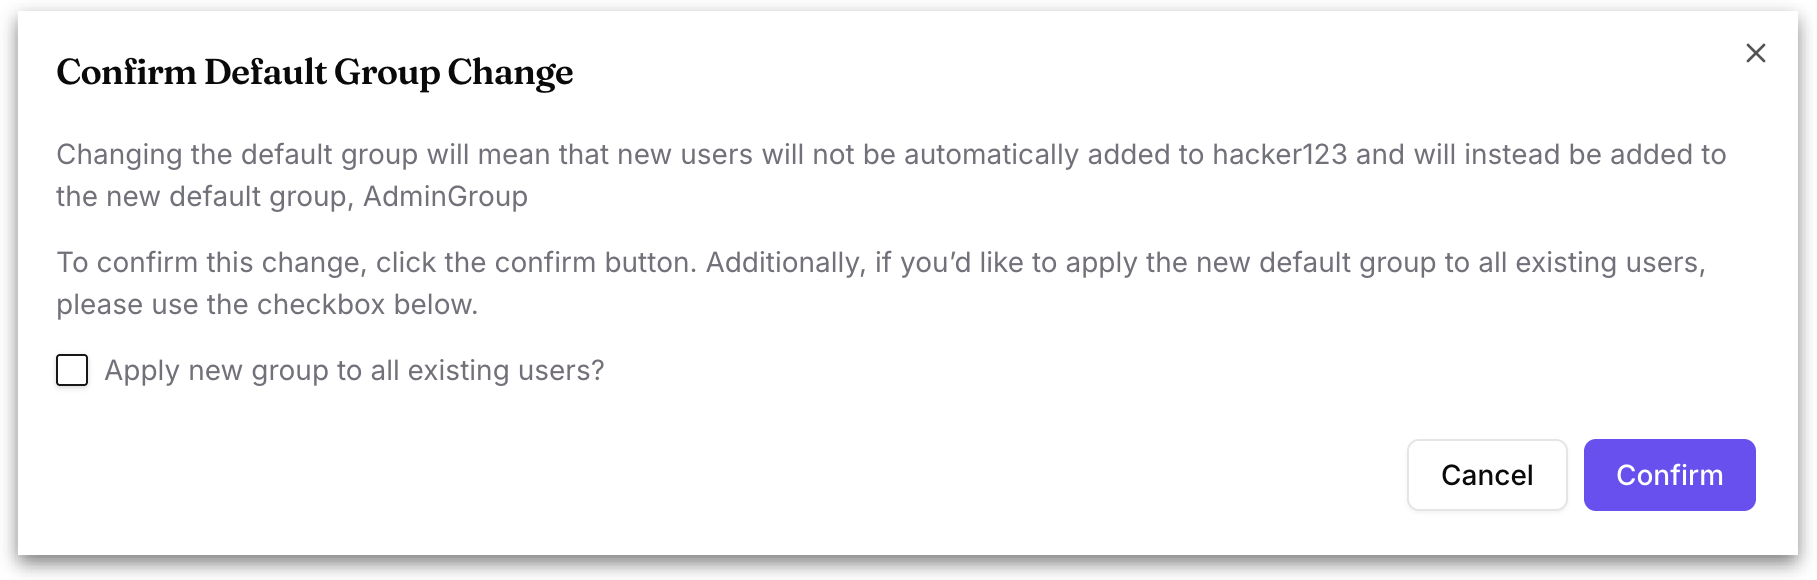
Once you enable, the following window will be displayed. The **Apply new group to all existing users?** checkbox in this dialog, when checked, additionally adds the new default group as a membership to every user that already exists in Tellius. Leave it unchecked if you only want the change to affect newly created users from this point forward. Click on Confirm to commit the change.
The list of existing user groups is displayed. Located at the top of the left pane, you can search for the required group to instantly filter the list of existing groups by name.
The group selected as the default will be marked with a ⭐ next to its name.
### Creating a new group
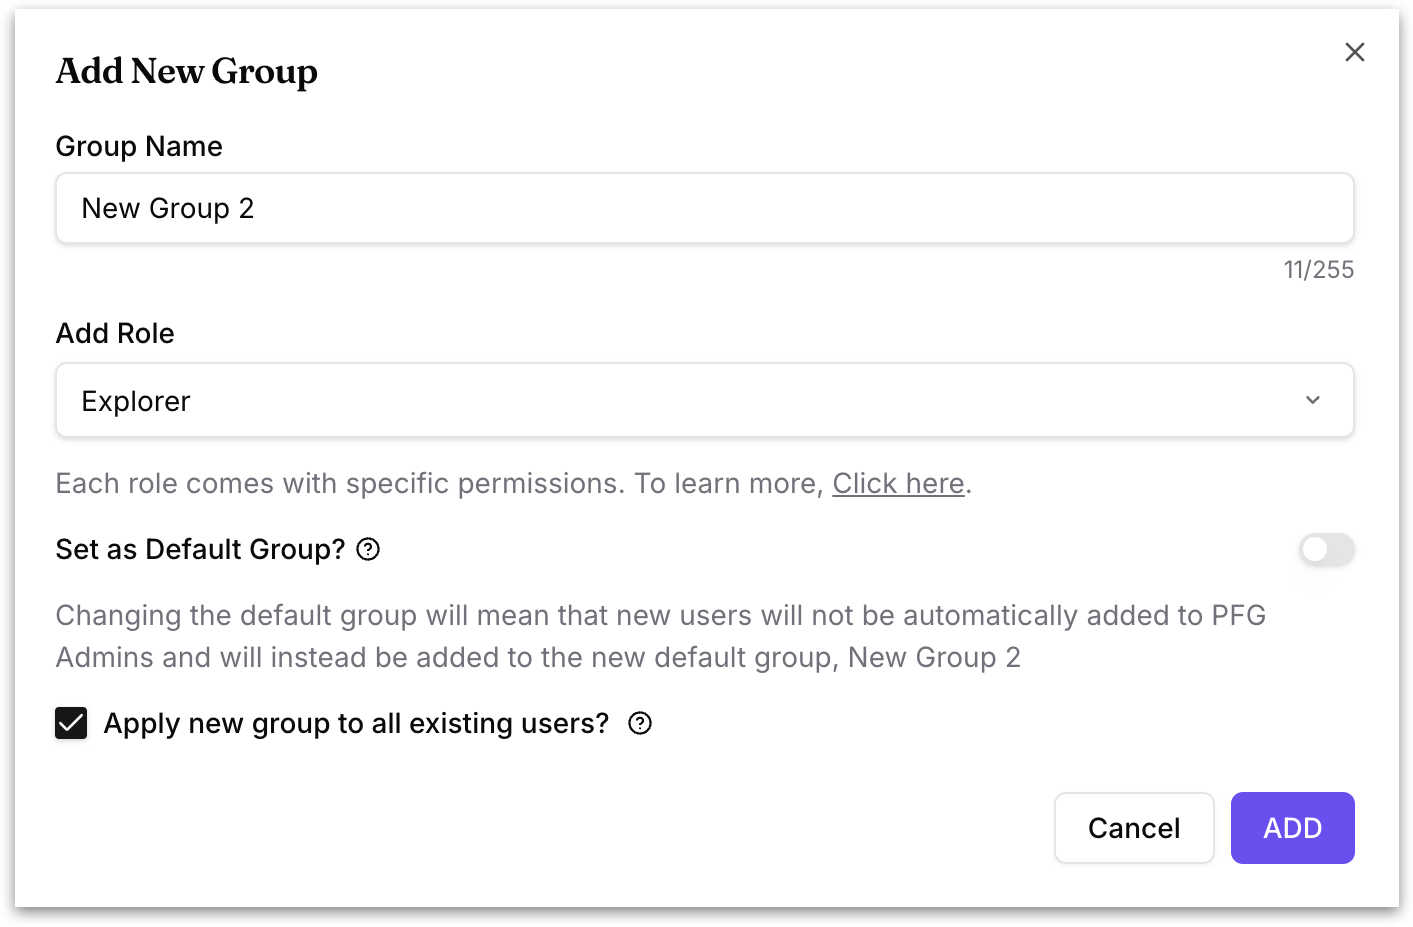
Click on the **"Create Group"** button next to the search field to create a new user group. Use the following window to define the new group, assign it as the default group for new users, and optionally apply it to existing users.
**Group Name:** Enter a unique name (with a limit of 255 characters) for the new group.
**Add Role**: Assign a default role to all users in this group.
{% hint style="warning" %}
This role determines the **baseline access level** for all users in the group. It can still be overridden at the individual user level if needed.
{% endhint %}
**Set as Default Group:** When enabled, this group becomes the **default group** for all newly created users. This overrides the current default group and new users will automatically be added to this group.
**Apply new group to all existing users?** If checked, this option assigns the new group to all current users in the system. Existing group memberships (if any) are retained—this is an additional group assignment, not a replacement. For example, a user who already belongs to "ABC" and "EFG" would, after this checkbox is enabled, belong to "ABC", "EFG", and the new group together. Helpful when introducing a new governance layer, shared role, or global policy.
Click on **Add** to finalize the creation of the new group or click on **Cancel** to dismiss.
For the selected group, three tabs control what its members get:
* **Members:** See who's in the group, search within it, and **Add User** to bring more people in. The per-member toggle and delete icon let you suspend or remove someone.
* **Row Level Policy:** Add a policy to limit which rows of data the group's members can see in a given Business View, so different teams see only their own slice of the data.
* **Personalized Filters:** Configure filters that apply to everyone in the group; a quick way to tailor what the whole group sees without editing each person.
### Members of a group
For each selected group, you can view the list of users associated with that particular group under **Members** tab in the right side. The search field can be used to filter for the required users. The following details will be displayed for each user:
* Name of the user
* Email ID
* Date and time of addition to the group
To deactivate the user, disable the toggle and the user will be temporarily locked from being active in the group.
To remove a user from the group, click on the **Delete** icon next to each user. This action does not delete the user from the system; only from this group.
#### Adding users to an existing group
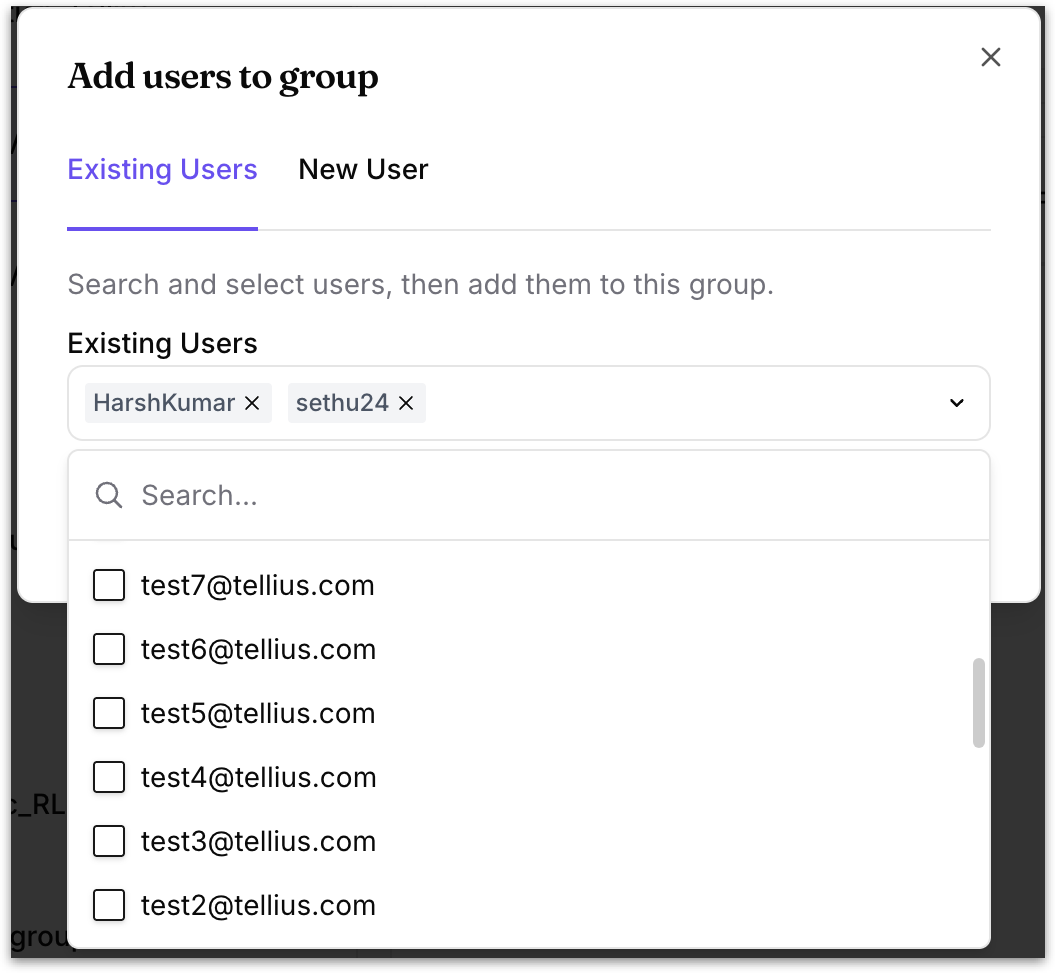
The following window allows admins to add users to groups or the system via two simple methods: selecting from existing users or manually creating a new user.
**Existing users:** Use this tab to search for users who already exist in your system. Use the dropdown to find and select an existing user from the list of all registered users.
Clicking into the field opens a **Search** box and a scrollable, checkbox-style list of every user in the directory. Type in the search box to narrow the list by username or email. Check the box next to each user you want to add; you can queue up as many users as the group needs in one pass. Unchecking a user (or clicking the **X** on their chip) removes them from the selection before you commit.
If the user doesn’t show up, use the **New User** tab to create them.
**New user:** Switch to this tab to create a new user account if they don’t already exist in the system. Check out [this page](/settings/users-and-access/users.md#how-to-create-a-new-user) to create a new user.
This tab creates the user account and adds them to the current group in a single step, so you don't have to bounce out to the Users page and come back.
Click on **Add** to add the selected user(s) to the group.
### **Row level policy**
Row-Level Security enables admins to **restrict data visibility** for specific user groups by defining filters that apply at the **row level** of a Business View. The filter is enforced at query time and applies everywhere the user encounters the Business View — search, Vizpads, Insights, Kaiya, exports, and scheduled refreshes.
For example, you can:
* Limit users in this group to see only data from their region, business unit, or product line. Users in the “Sales-West” group can only see rows where `Region = 'West'`
* Apply SQL-like conditions or filters to restrict access based on user attributes.
This ensures users only see the data they're allowed to access, based on their group membership.
If no Row-Level Policy is applied to a group, members will see all rows of the associated datasets. Use row-level security to meet compliance, privacy, and data partitioning requirements.
#### **How to create a row level policy**
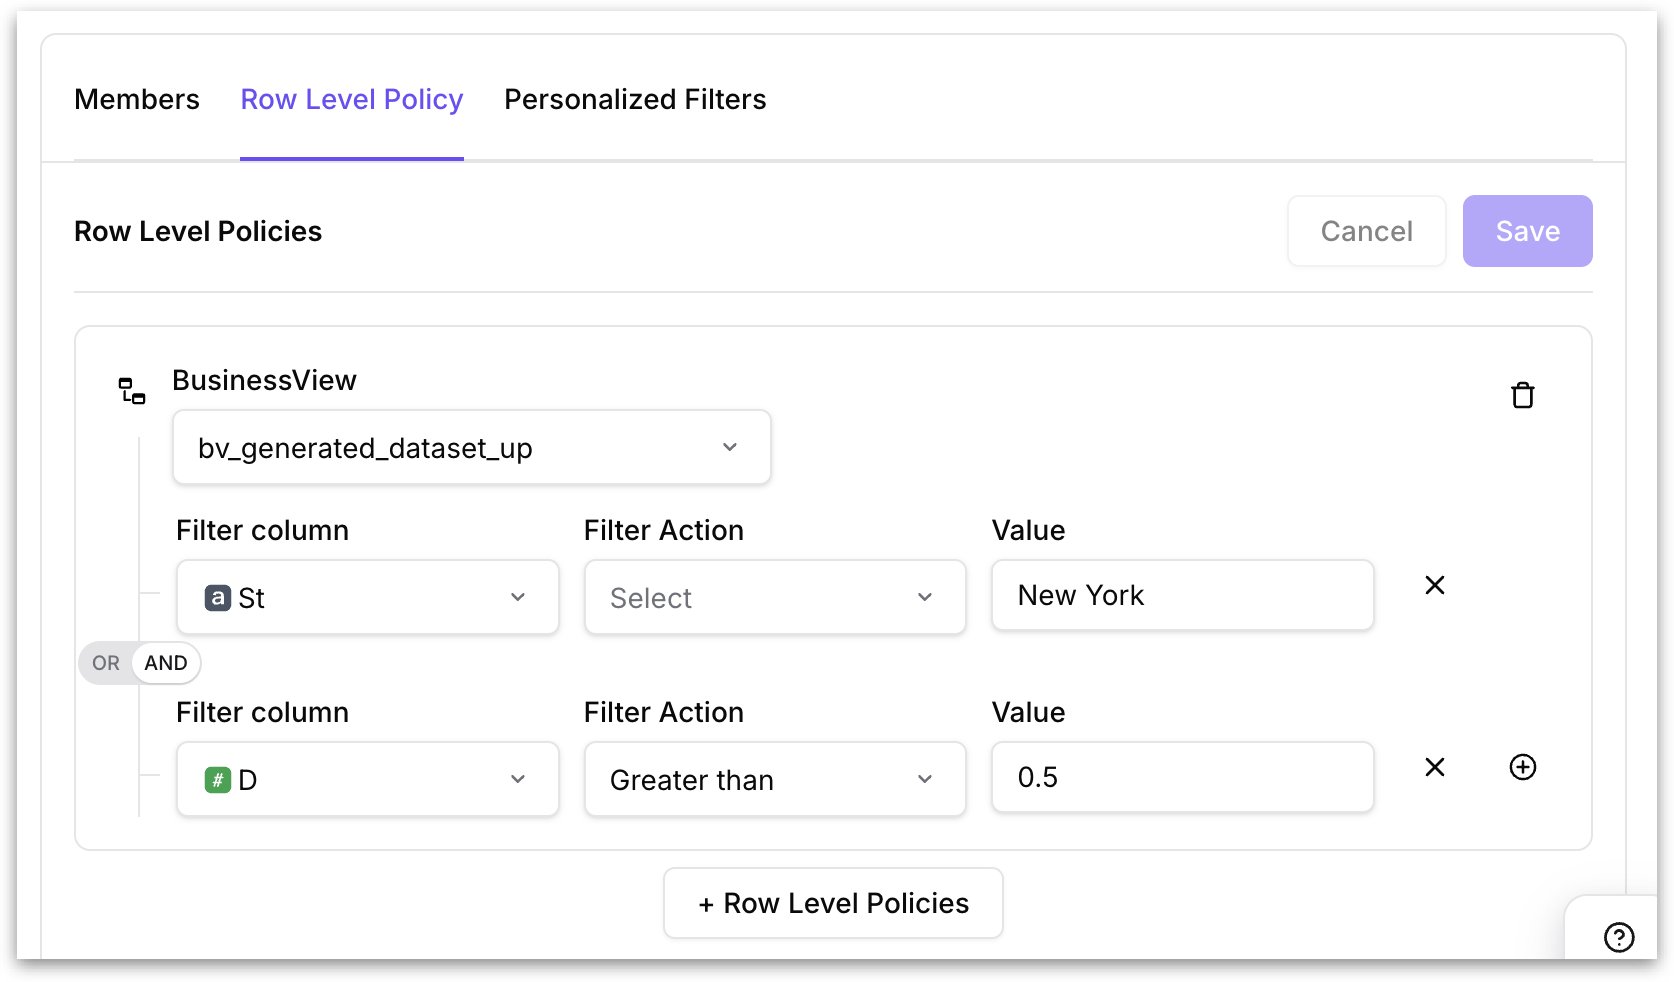
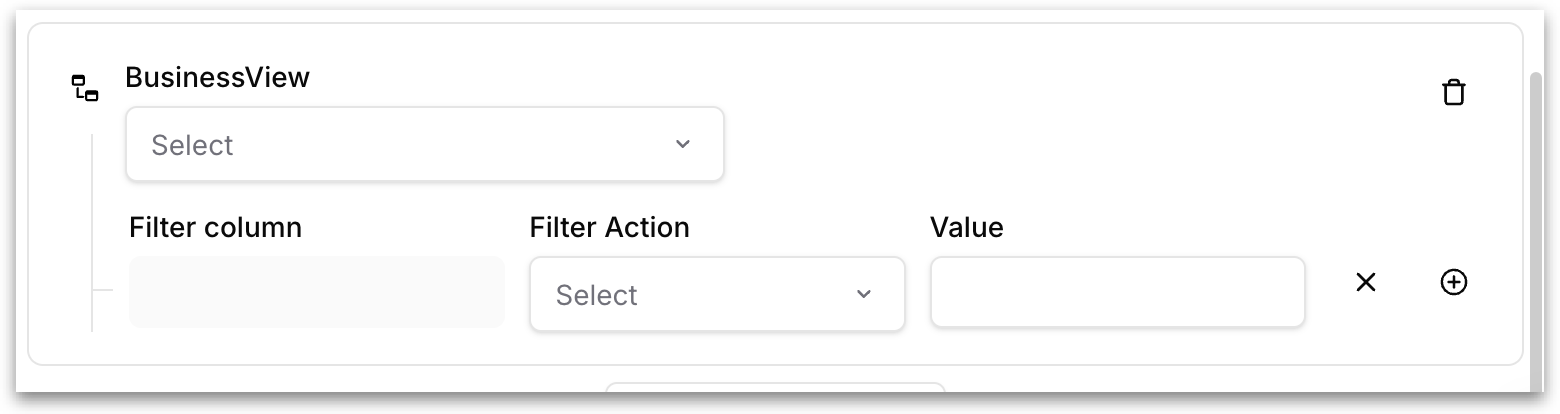
Click the **+ Row Level Policies** button at the bottom of the tab to add a new policy block. Each policy block is scoped to one Business View and can contain one or many filter rules.
Inside a policy block you'll configure the following fields:
**BusinessView:** A dropdown to select the Business View this policy applies to.
**Filter column:** A dropdown that picks the column inside the chosen Business View to filter on.
**Filter Action:** A dropdown that picks the operator used to evaluate the rule, such as Equals, In, Greater than, Less than, Contains, and so on. The options available depend on the data type of the column you picked: string columns offer text-style comparisons (Equals, Contains, In), while numeric columns offer mathematical comparisons (Greater than, Less than, Between).
**Value:** A free-text field for the value the filter is compared against. The format must match the column's data type — a string column won't accept numeric-only input and vice versa.
#### **Combining filters inside one policy block**
A single policy block can contain multiple filter rows that further narrow what the group can see. To add another filter inside the same block, click the **+** button to the right of the last filter row.
Between any two filter rows is a small **OR / AND** toggle pill that controls how the rules combine.
* **AND** means both conditions must be true for a row to be visible (the group sees only rows where `State = 'New York'` *and* `D > 0.5`).
* **OR** means either condition alone is enough (the group sees rows where `State = 'New York'` *or* `D > 0.5`).
* Choose AND when you want progressively narrower restrictions and OR when you want to allow any of several conditions.
To delete a single filter row inside a block, click the **X** to the far right of the Value field.
#### **Adding more policy blocks**
To restrict a different Business View under the same group, click **+ Row Level Policies** again at the bottom of the tab. A new empty block appears, ready for you to pick a new Business View and define a fresh set of filter rules. Each block is independent: the BusinessView dropdown, the filters inside it, and the combine logic all apply only within that block.
To delete an entire policy block (the Business View and every filter inside it together), click the **trash icon** in the top-right corner of the block.
Click on **Save** to commit all policy changes; once saved, every member of the group is immediately restricted to the rows the rules allow. **Cancel** discards every unsaved change since you last opened the tab.
### Personalized Filters
The Personalized Filters tab lets you decide what data members of this group should see by default. When someone in the group opens a Vizpad, Tellius automatically filters it down to their data.
For example, you can set "Region = West" once for the West Sales group, and every Vizpad those users open will already be filtered to the West region. It works alongside the **Personalized Tags** page (under Workspace → Users & Access), where the tags themselves are defined.
{% hint style="info" %}
Personalized Filters is different from **Row Level Policy**. Row Level Policy is a hard security restriction that the user cannot see around. A personalized filter is a convenience default — Tellius pre-applies it when a Vizpad or Insight loads, but the user can still see the filter, modify it, or clear it for their own session.
Use Row Level Policy when the user must never see the data; use Personalized Filters when you want the right filter value to be there waiting for them.
{% endhint %}
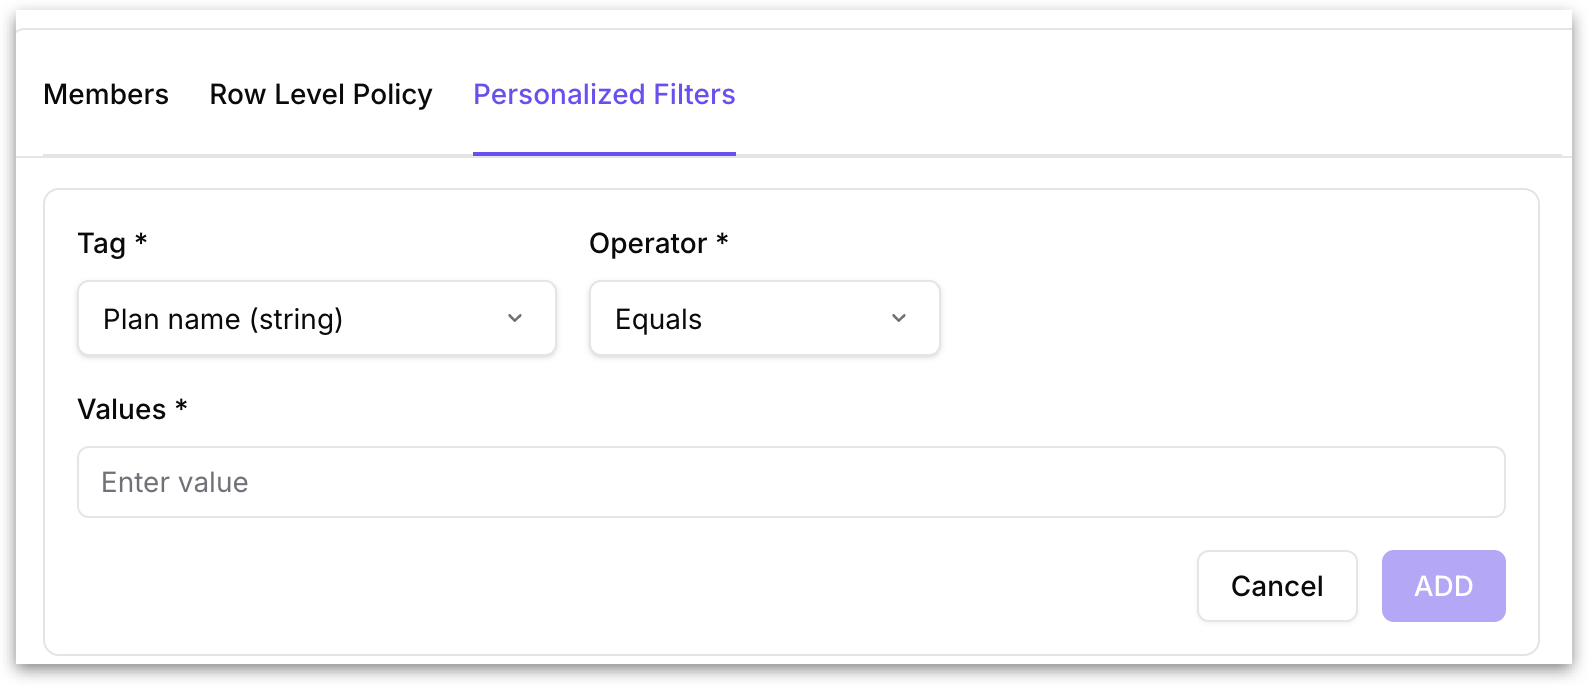
To the right is an **Add Filter** button that opens the form for defining a new filter.
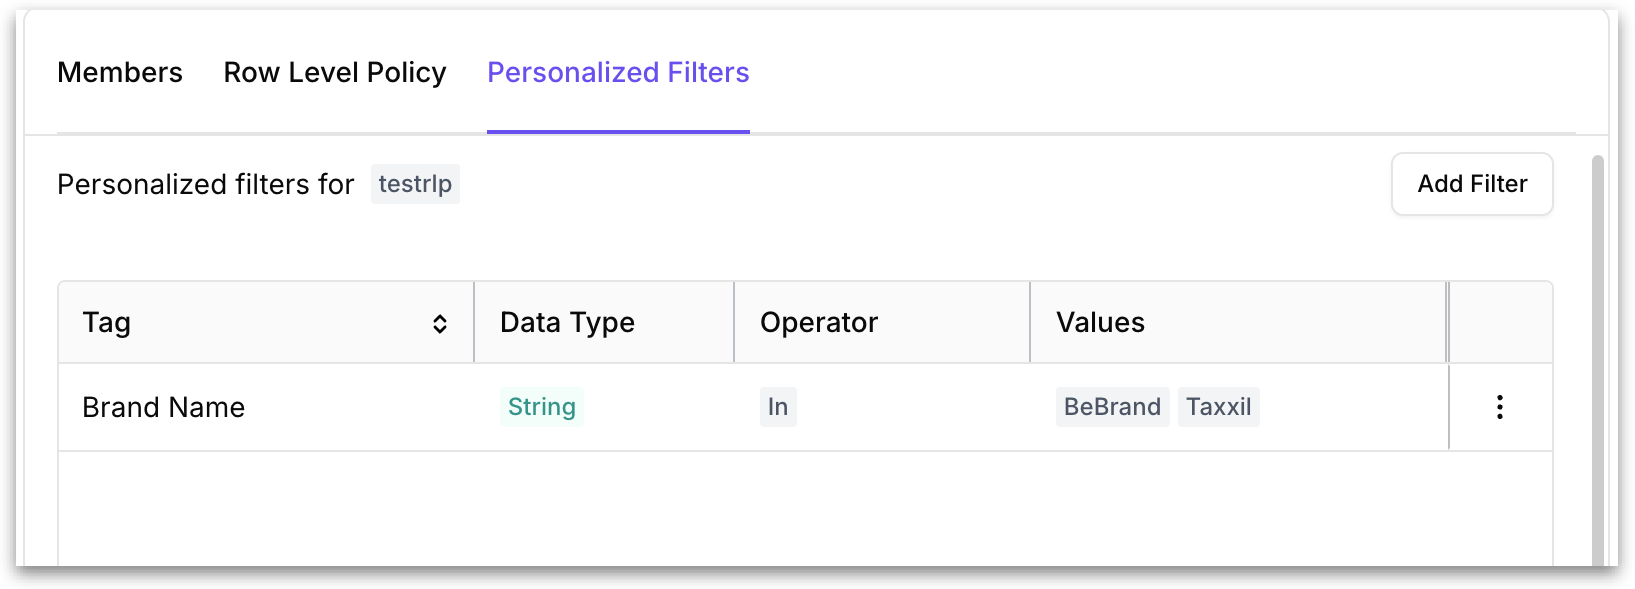
A table displays every personalized filter currently configured on this group, with one row per filter. The columns are
* **Tag** (the personalized tag the filter is bound to)
* **Data Type** (inherited from the tag definition)
* **Operator** (the comparison used)
* **Values** (the value or values the filter applies, each shown as its own chip when there are multiple). The three-dot action menu at the end of each row lets you edit or delete an existing filter.
For the full setup flow, check out [Tag-based personalized filters](https://help.tellius.com/vizpads-explore/tag-based-personalized-filters).
---
# Agent Instructions
This documentation is published with GitBook. GitBook is the documentation platform designed so that both humans and AI agents can read, navigate, and reason over technical content effectively. Learn more at gitbook.com.
## Querying This Documentation
If you need additional information that is not directly available in this page, you can query the documentation by asking a question.
Perform an HTTP GET request on the following URL with the `ask` and `goal` query parameters:
```
GET https://help.tellius.com/settings/users-and-access/groups.md?ask=&goal=
```
`ask` is the immediate question: it should be specific, self-contained, and written in natural language.
`goal` is what the user is ultimately trying to achieve, the reason they need the answer. Sharing it helps GitBook give you a better, more relevant answer. A goal is most helpful when it describes the outcome the user wants rather than restating the question. For example, with `ask=how do I create an API token`, a goal like `automate deployments from our CI pipeline` lets GitBook tailor the answer to that use case.
The response will contain a direct answer to the question and relevant excerpts and sources from the documentation.
Use this mechanism when the answer is not explicitly present in the current page, you need clarification or additional context, or you want to retrieve related documentation sections.