> For the complete documentation index, see [llms.txt](https://help.tellius.com/llms.txt). Markdown versions of documentation pages are available by appending `.md` to page URLs; this page is available as [Markdown](https://help.tellius.com/settings/users-and-access/users.md).
# Users
Users is where you manage everyone who can sign in to your workspace — creating accounts, setting roles, controlling group membership, and switching access on or off.
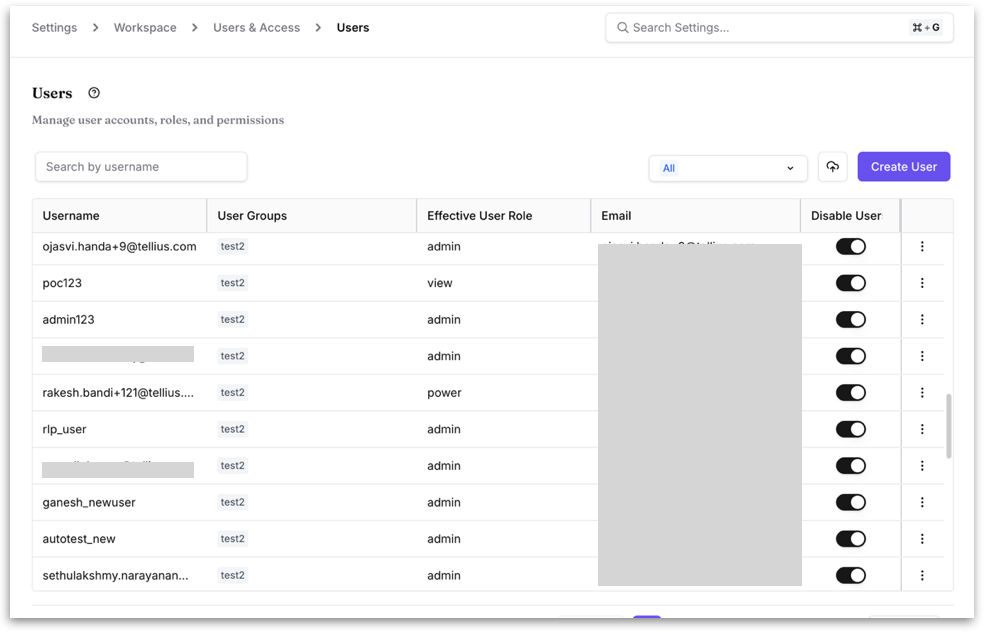
**Finding users:** Use *Search by username* to jump to a specific person, or use the role filter (**All, Admin, Power, Interactive, Explorer, Discover, Explore & Discover**) to narrow the list to one access level.
The table shows each user's username, the groups they belong to, their effective user role, and email. The Disable User toggle switches a person's access off without deleting their account, and back on whenever you need.
### Bulk upload
**Bulk Personalized Filter Upload:** The upload icon beside **Create User** lets you apply personalized (row-level) filters to many users at once from a single file, instead of setting them one person at a time.
It is described here as [Step 4](https://help.tellius.com/vizpads-explore/tag-based-personalized-filters#step-4-optional-bulk-upload-personalization-for-many-users). Upload your file, map the user column to a Tellius user field, validate, then map your file columns and apply.
### **How to create a new user**
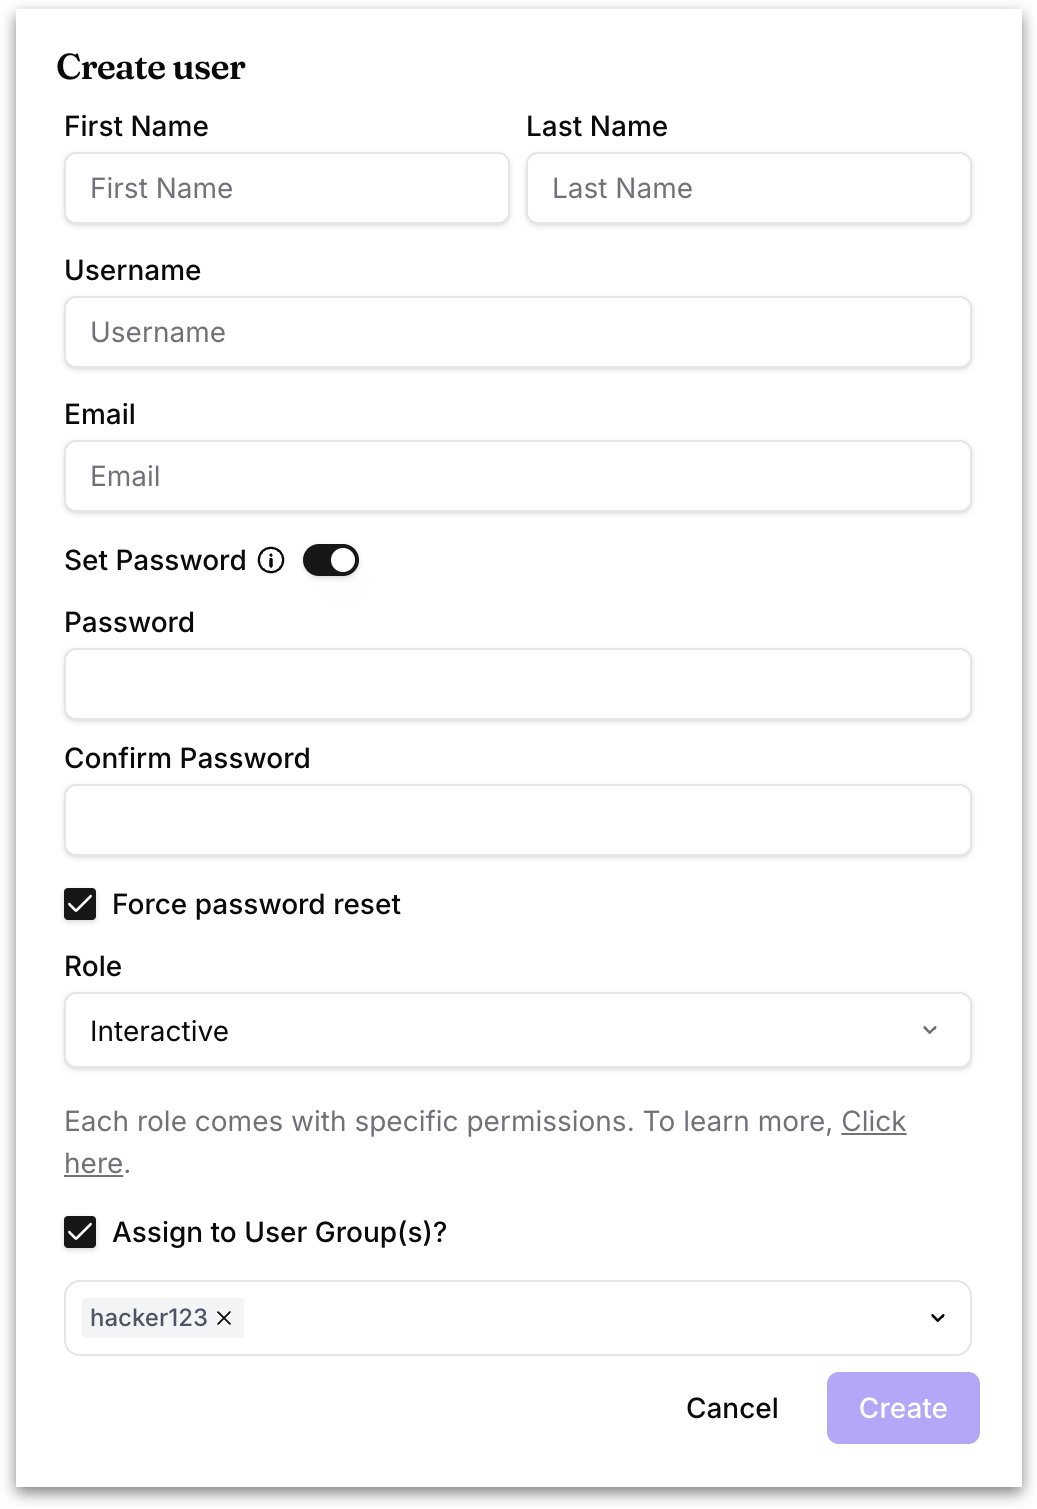
Click on **Create User** and the following window will be displayed.
* **First Name / Last Name:** Editable fields for the user’s display name.
* **Username:** A unique identifier for the user’s login and internal reference.
* **Email:** Used for login, notifications, password recovery, and system alerts.
* **Effective user role:** A read-only field indicating the actual permissions the user has. Hover over the info icon for more context on role resolution.
* **Change Password:** Opens a dialog to set or reset the user’s password.
* **Force password reset (checkbox):** If checked, the user will be required to change their password the next time they log in.
* **Role:** A dropdown that assigns a system role to the user. Each role includes a set of permissions. Click on the link to explain what each role can do.
{% hint style="warning" %}
To know more about roles and their permissions, check out [this page](https://help.tellius.com/settings/users-and-groups/user-roles-and-permissions).
{% endhint %}
* **Assign to user group(s):** When checked, enables group assignment for the user. The group selector is a searchable dropdown for assigning one or more groups to the user.
{% hint style="info" %}
Assign users to at least one group for proper access control.
{% endhint %}
* **Save:** Click on **Save** to save all edits made to the user’s profile.
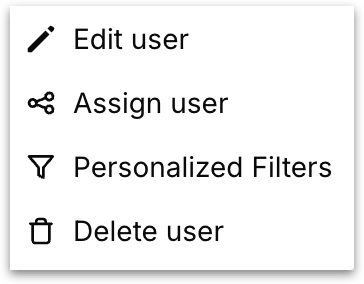
**Managing a user:** Each row's three-dot action menu gives you **Edit** **user** (update details or role), **Assign user** (assign the ), **Personalized Filters** (row-level filters controlling which data the person can see), and **Delete user** (permanently remove the account).
### How to assign content of one user to another
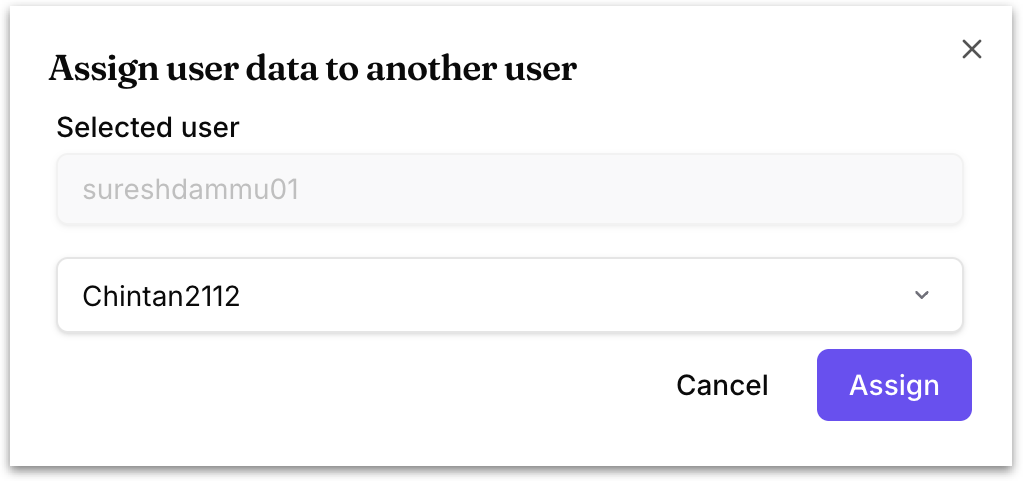
The following **Assign user** window allows admins to transfer all owned content and data assets from one user to another. It's commonly used when deactivating a user or reassigning responsibilities.
**Selected User:** A read-only field that displays the username of the person whose data is being reassigned.
**Target User:** Enter the username of the person who should receive the data.
Click on **Assign** to transfer the ownership from the selected user to the target user. Click on **Cancel** to close the dialog without making any changes.
{% hint style="warning" %}
This operation does not delete the selected user; it only transfers asset ownership. Once data is reassigned, it may no longer be visible or accessible from the original owner’s profile.
{% endhint %}
### How to delete a user
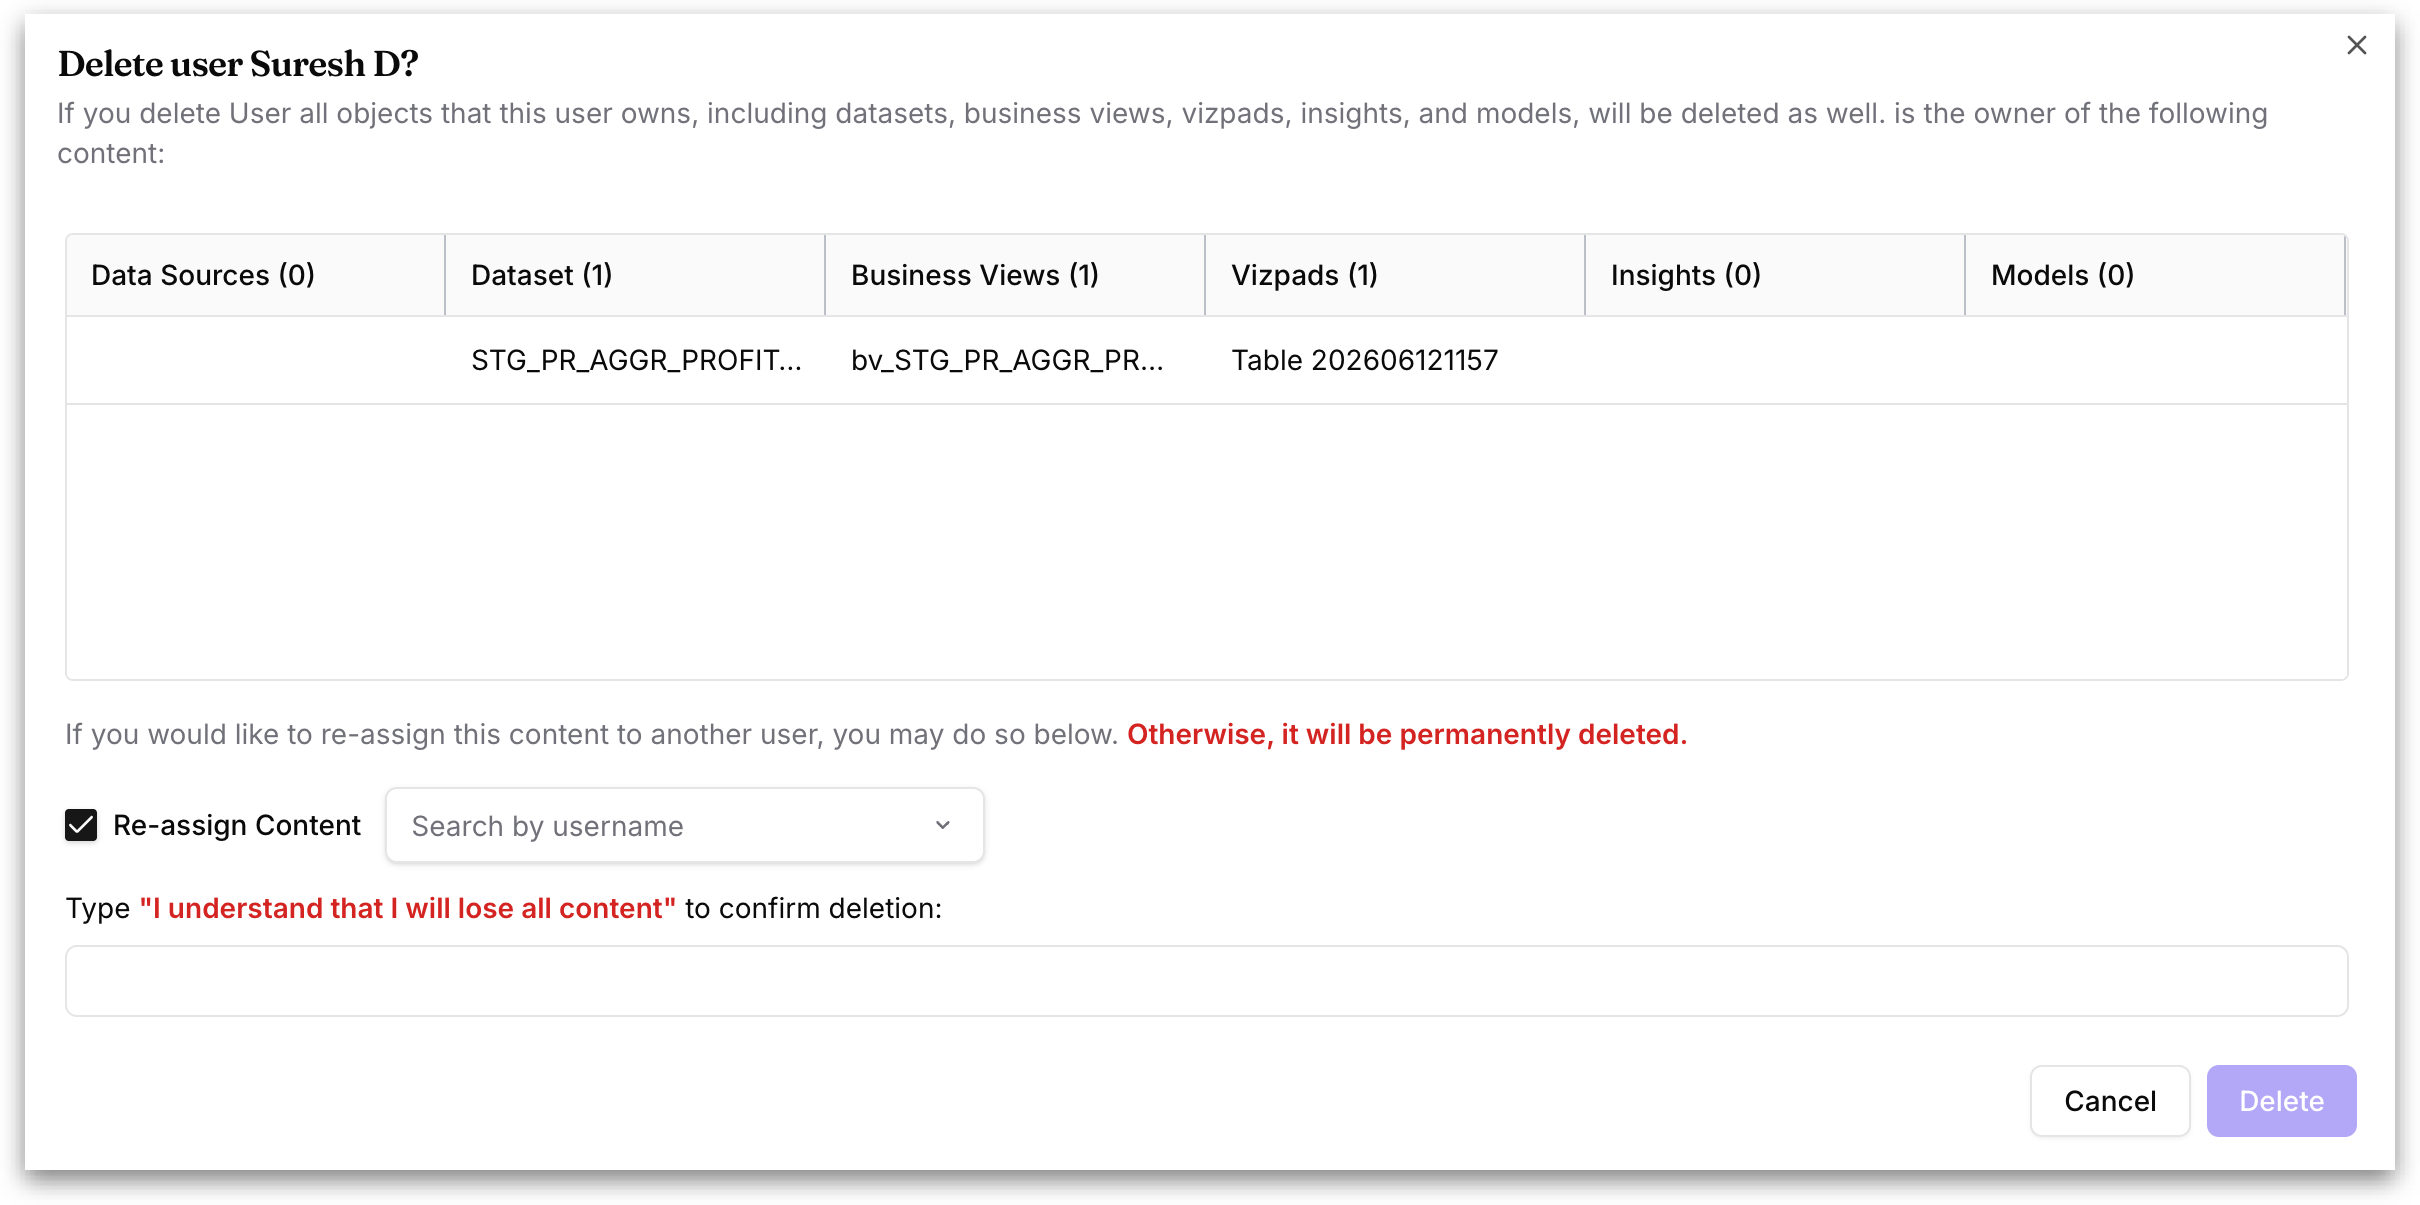
The following window will be displayed when permanently removing a user from Tellius. It provides visibility into the content owned by the user and allows safe reassignment to prevent accidental data loss.
When you delete a user, all assets owned by them (including datasets, Business Views, Vizpads, Insights, and Models) will be removed unless you reassign them to another user beforehand.
**Re-assign Content:** If enabled (checked), you can transfer all user-owned content to another user before deletion. Search and select the new owner (e.g., `NagarajT`). All assets will be reassigned to this user upon deletion.
If a user is leaving your organization, reassign their content before deleting their account. Once deleted without reassignment, all listed content is permanently lost and unrecoverable.
To prevent accidental deletion, you must manually confirm your intent by typing: *"I understand that I will lose all content"*.
Only after entering this exact phrase, the **Delete** button will become active. Click on **Delete** to finalize the deletion or click on **Cancel** to dismiss.
{% hint style="warning" %}
Before you delete a user, ask your Content admin to review that user's datasets, Business Views and Vizpads, and share anything the team still needs.
{% endhint %}
---
# Agent Instructions
This documentation is published with GitBook. GitBook is the documentation platform designed so that both humans and AI agents can read, navigate, and reason over technical content effectively. Learn more at gitbook.com.
## Querying This Documentation
If you need additional information that is not directly available in this page, you can query the documentation by asking a question.
Perform an HTTP GET request on the following URL with the `ask` and `goal` query parameters:
```
GET https://help.tellius.com/settings/users-and-access/users.md?ask=&goal=
```
`ask` is the immediate question: it should be specific, self-contained, and written in natural language.
`goal` is what the user is ultimately trying to achieve, the reason they need the answer. Sharing it helps GitBook give you a better, more relevant answer. A goal is most helpful when it describes the outcome the user wants rather than restating the question. For example, with `ask=how do I create an API token`, a goal like `automate deployments from our CI pipeline` lets GitBook tailor the answer to that use case.
The response will contain a direct answer to the question and relevant excerpts and sources from the documentation.
Use this mechanism when the answer is not explicitly present in the current page, you need clarification or additional context, or you want to retrieve related documentation sections.