> For the complete documentation index, see [llms.txt](https://help.tellius.com/llms.txt). Markdown versions of documentation pages are available by appending `.md` to page URLs; this page is available as [Markdown](https://help.tellius.com/tellius-6.4/kaiya/kaiya-missions/scheduling-missions.md).
# Scheduling Missions
Learn how Kaiya Missions automate recurring analytics workflows, proactive monitoring, and AI-driven business actions inside Tellius.
## Scheduling Missions in Tellius 6.4
A schedule runs a Mission on its own and sends each run's briefing to the people and channels you choose. Each schedule runs one Mission. A Mission can have several schedules, for example one that runs daily and one that runs weekly. To run several Missions on the same cadence, create a schedule for each Mission.
**Open the list of schedules.** Select **Missions** in the left navigation (or under **More**), then select **View Schedules**. The **Scheduled Missions** list opens. Use the **All**, **Created by me** and **Shared with me** tabs, **Search**, the **Sorting** filter, and the **Mission** and **User** filters to find a schedule. **Reset** returns the sorting and filters to their defaults.
Each row is one schedule. The columns show the **Mission Name**, the **Schedule** name, the **Frequency**, the **Next Run** and **Last Run** times (a dash until the first run), the user who created the schedule (**Created By**) and when (**Created On**), and **Subscribed**.
{% hint style="info" %}
**Find every schedule of one Mission.** Pick the Mission in the **Mission** filter. Starting from the Mission's own page with **Create Schedule** opens the list already filtered to that Mission, which is the quickest way to check for a schedule before you add another.
{% endhint %}
**Create a schedule.** Select **Schedule** on the Scheduled Missions page, or open the **Schedule** tab of the Mission. From a Mission's own page, open the three-dot menu and select **Create Schedule**: **Scheduled Missions** opens, filtered to that Mission, with the schedules it already has, and **Schedule** opens the form with the Mission filled in. The form is a single page with these fields:
* **Mission:** the Mission this schedule runs. This field appears when you start from the Scheduled Missions page. On the Mission's **Schedule** tab, the Mission is already set.
* **Schedule Name:** the name shown in the Scheduled Missions list. Pick a name your readers will recognise.
* **Cadence:** **Start Date**, **Start Time** and **Frequency** (**Hourly**, **Daily**, **Weekly**, **Monthly**, **Quarterly** or **Yearly**). The start date and start time decide when each run happens.
* **Delivery:** where each run's briefing goes. Turn on **Email**, **Slack** or **Microsoft Teams**, or more than one. Email has **Recipients** and **Cc/Bcc**. For Slack and Microsoft Teams, choose **Send to my DM** or **Post to a channel**. Slack lists only channels the Kaiya bot has been invited to, and Microsoft Teams lists only channels where the Kaiya bot is a member.
* **Email Subject:** the subject line of the briefing email.
* **Message:** a short note that goes with the briefing to every enabled channel.
**When you select Create Schedule.** What happens next depends on whether the Mission has input steps, which ask for a value such as a region or a time period.
* **A Mission with no input steps** needs nothing more. The cadence and delivery you set are all the schedule needs.
* **A Mission with input steps** can have two kinds. A **static** input doesn't depend on earlier steps, so its options are known before the run. A **dynamic** input depends on the result of an earlier step, such as the regions with the biggest decline this week, so its options are known only while the Mission runs.
For a Mission with input steps, Kaiya opens the schedule's conversation and starts a first run. It runs the Mission up to each input step and asks you there, with the real options for that run. Choose an option, or type a hint that tells Kaiya how to choose, for example *"Always pick the region with the biggest decline."* Kaiya keeps your answers and uses them on every scheduled run, so later runs don't stop to ask.
{% hint style="success" %}
**Writing a good hint for a dynamic input.** A dynamic input's options can change from run to run. When the schedule should follow the data, give a rule instead of a fixed value, such as *"the region with the largest week-over-week decline"* or *"the top brand by sales this month"*. Name one measure and one direction, so Kaiya applies the rule the same way on every run. Choose a fixed option, such as one named region, when every run should report on the same thing.
{% endhint %}
**One conversation for each schedule.** Each schedule has its own conversation, and every scheduled run of it appears there. Open it with **Open schedule conversation** in the schedule's row menu. Because the runs sit together, you can compare this week's run with last week's and ask follow-up questions in the same place. In releases before Tellius 6.4, each scheduled run created a new conversation.
**Delivery and times.** Kaiya sends the briefing email itself, with the same report you see in the conversation, and posts the Slack and Microsoft Teams messages. Schedule times are shown in your own time zone.
**Memories.** Scheduled runs use the memories of the schedule's owner.
Files sent with a run come from the Mission's export steps, such as a PDF report, PowerPoint deck, Word document, Excel workbook or CSV file. To send a file with every run, ask Kaiya to add an export step to the Mission, for example *"Add a PDF export of the weekly brief."*
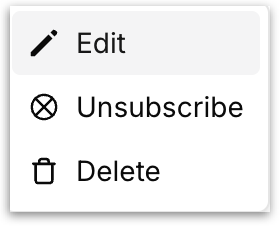
**Change or remove a schedule.** Select the three-dot menu on the schedule's row in Scheduled Missions. **Edit** opens the form, and **Update Schedule** saves your changes. The same menu has **Open schedule conversation**, **View Subscribers** and **Delete**.
**Check past runs.** Open the Mission and open its run selector. **Run history** shows how many times the Mission has run, the share of runs that completed and the average run time. Each run shows how it started, such as **Scheduled** or **Run manually**.
**Schedules and new versions.** A schedule always runs the Mission's active version. While you change the Mission in a draft, the schedule keeps running the published steps. When you publish the draft, the existing schedule uses the new steps on its next run. You don't need to create the schedule again. A run made before you publish is a preview, and its result stays on the Mission's **Preview** tab. After you publish, runs appear in the conversation, and files from export steps appear on the export step's card. You can also ask Kaiya in the Mission's conversation to change the schedule, for example *"Run it weekly instead of daily."* When the Mission already has a schedule, Kaiya changes that schedule rather than adding a second one.
**Missions built before Tellius 6.4.** Their schedules keep running at the same times and send to the same places. Creating a schedule for one works the same way as for any other Mission. If an older Mission's steps still hold placeholder values from earlier releases, Kaiya fills them in on its own during the run, and may suggest updating the plan so later runs don't need this. See [Missions built before Tellius 6.4](https://help.tellius.com/kaiya/kaiya-missions/missions-built-before-tellius-6-4).
{% hint style="warning" %}
A scheduled run can't search the web, and Python steps can't call outside services. A Mission reads its data from Business Views, Kaiya Context Models, connected systems and indexed documents. In Tellius 6.4, scheduled runs can read from connected systems but can't write to them yet.
{% endhint %}
For every field and option, see [Schedule tab](https://help.tellius.com/kaiya/kaiya-missions/how-to-create-a-kaiya-mission/the-mission-pane#schedule-tab) and [Scheduled Missions](https://help.tellius.com/kaiya/kaiya-missions/how-to-create-a-kaiya-mission/mission-library-and-mission-page#scheduled-missions).
## Earlier releases
{% hint style="warning" %}
The rest of this page describes scheduling in releases before Tellius 6.4, including the **Mission Library** button, the two-step **Create new schedule** wizard, the **Author** filter, the **Outputs** tab and schedules shared across Missions. For Tellius 6.4, see the section above and the [Schedule tab](https://help.tellius.com/kaiya/kaiya-missions/how-to-create-a-kaiya-mission/the-mission-pane#schedule-tab) on the Mission page.
{% endhint %}
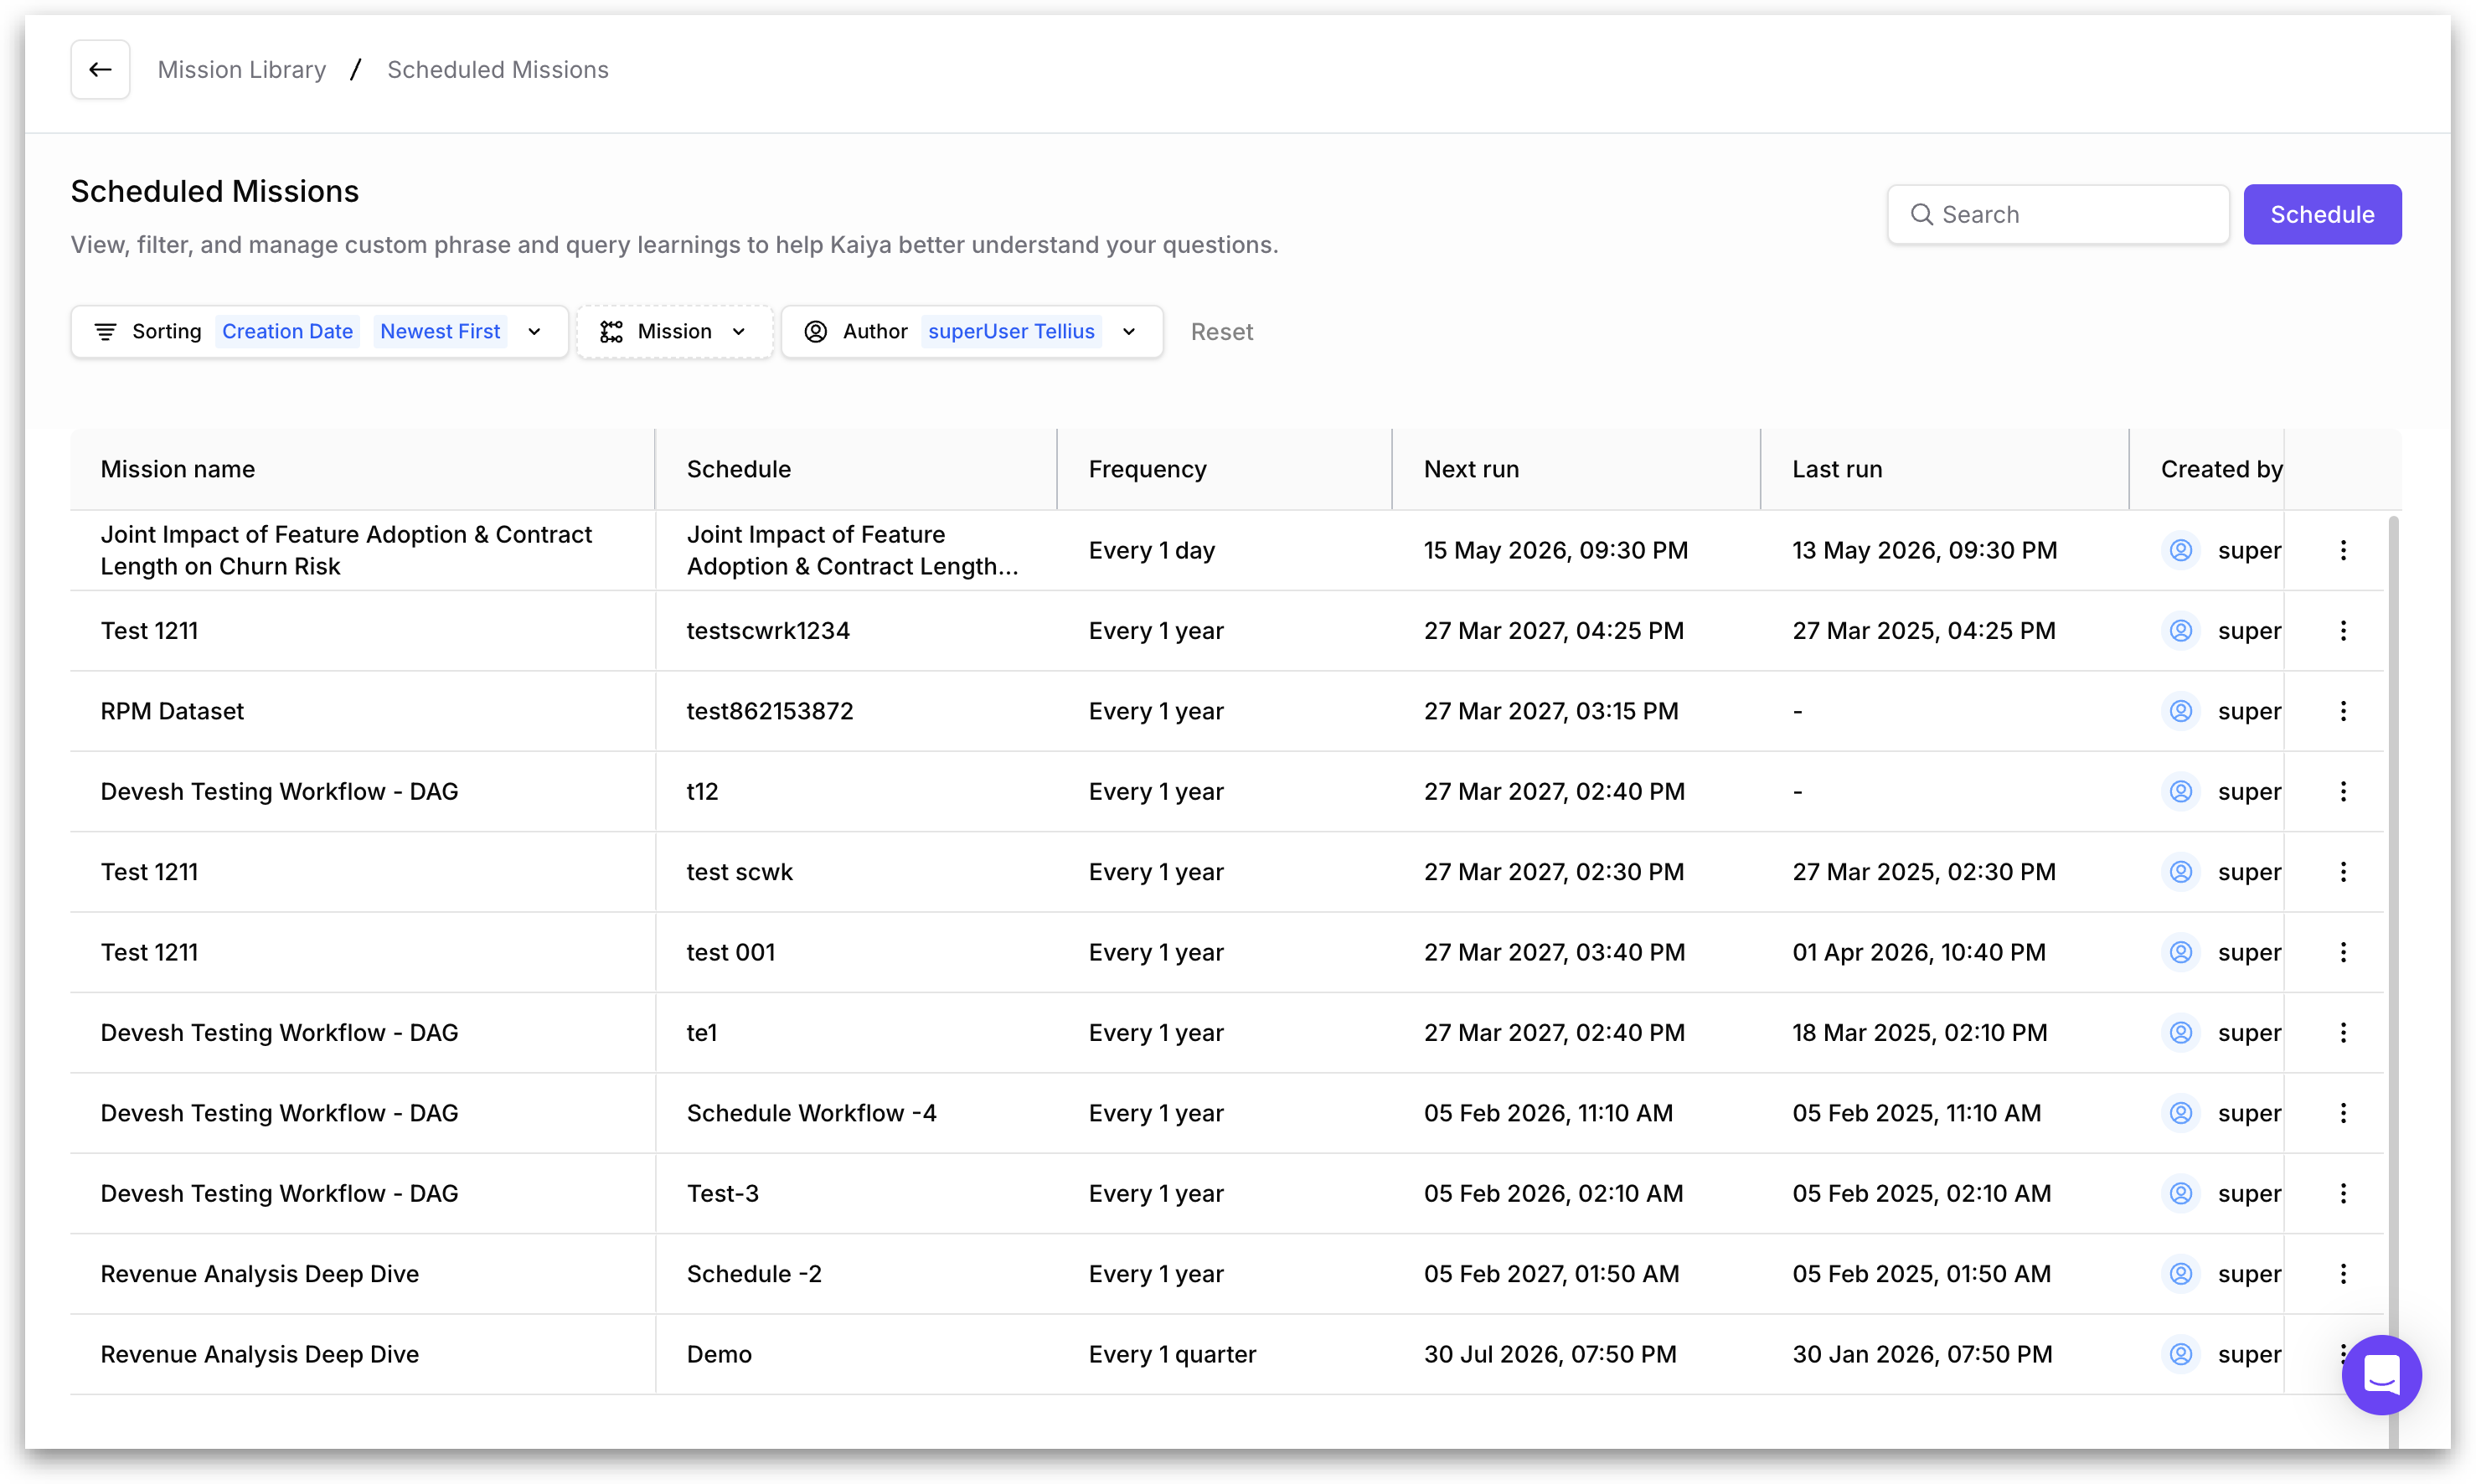
The **Scheduled Missions** page is where you view, filter, and manage every Mission that runs on a recurring schedule. From here you can see when each scheduled Mission last ran, when it's running next, who created it, and at what frequency.
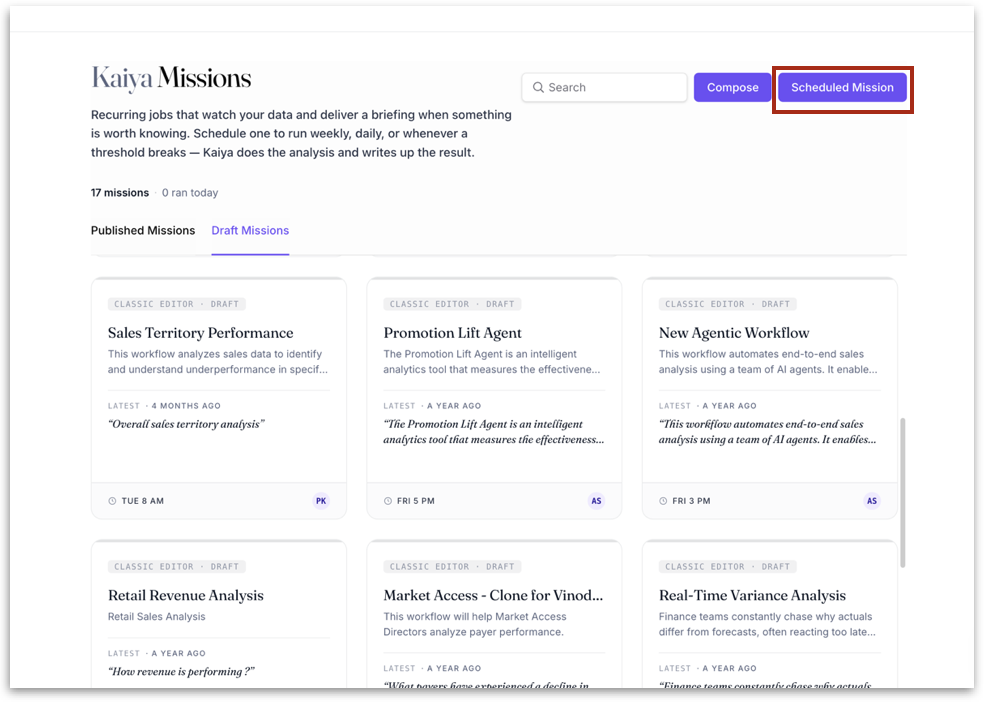
To open it, go to **Kaiya → Missions → Mission Library** and click the **Scheduled Mission** button at the top right.
**What you'll see on the page**
Each row in the table represents one scheduled Mission, with the following columns:
* **Mission name:** the name of the Mission this schedule belongs to.
* **Schedule:** the name of the schedule itself (a single Mission can have more than one schedule attached to it).
* **Frequency:** how often the Mission runs.
* **Next run:** the date and time of the next scheduled execution.
* **Last run:** when the Mission was last executed. Displays "—" if it hasn't run yet.
* **Created by:** the user who created the schedule.
A three-dot menu at the end of each row lets you take actions on that schedule.
**Filtering and sorting**
Three controls at the top of the table help narrow the view:
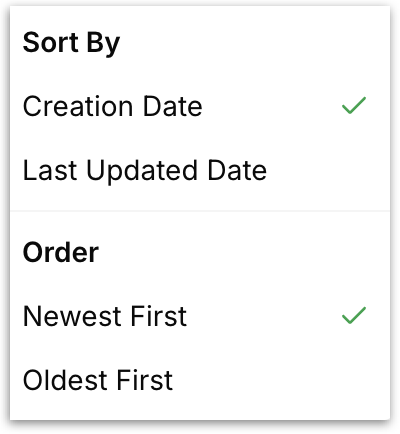
* **Sorting:** sort by date and recency
* **Mission:** filter to schedules belonging to a specific Mission.
* **Author:** filter to schedules created by a specific user.
Click **Reset** to clear all filters. Use the **Search** bar in the top right to find a schedule by name.
### **How to create a new schedule**
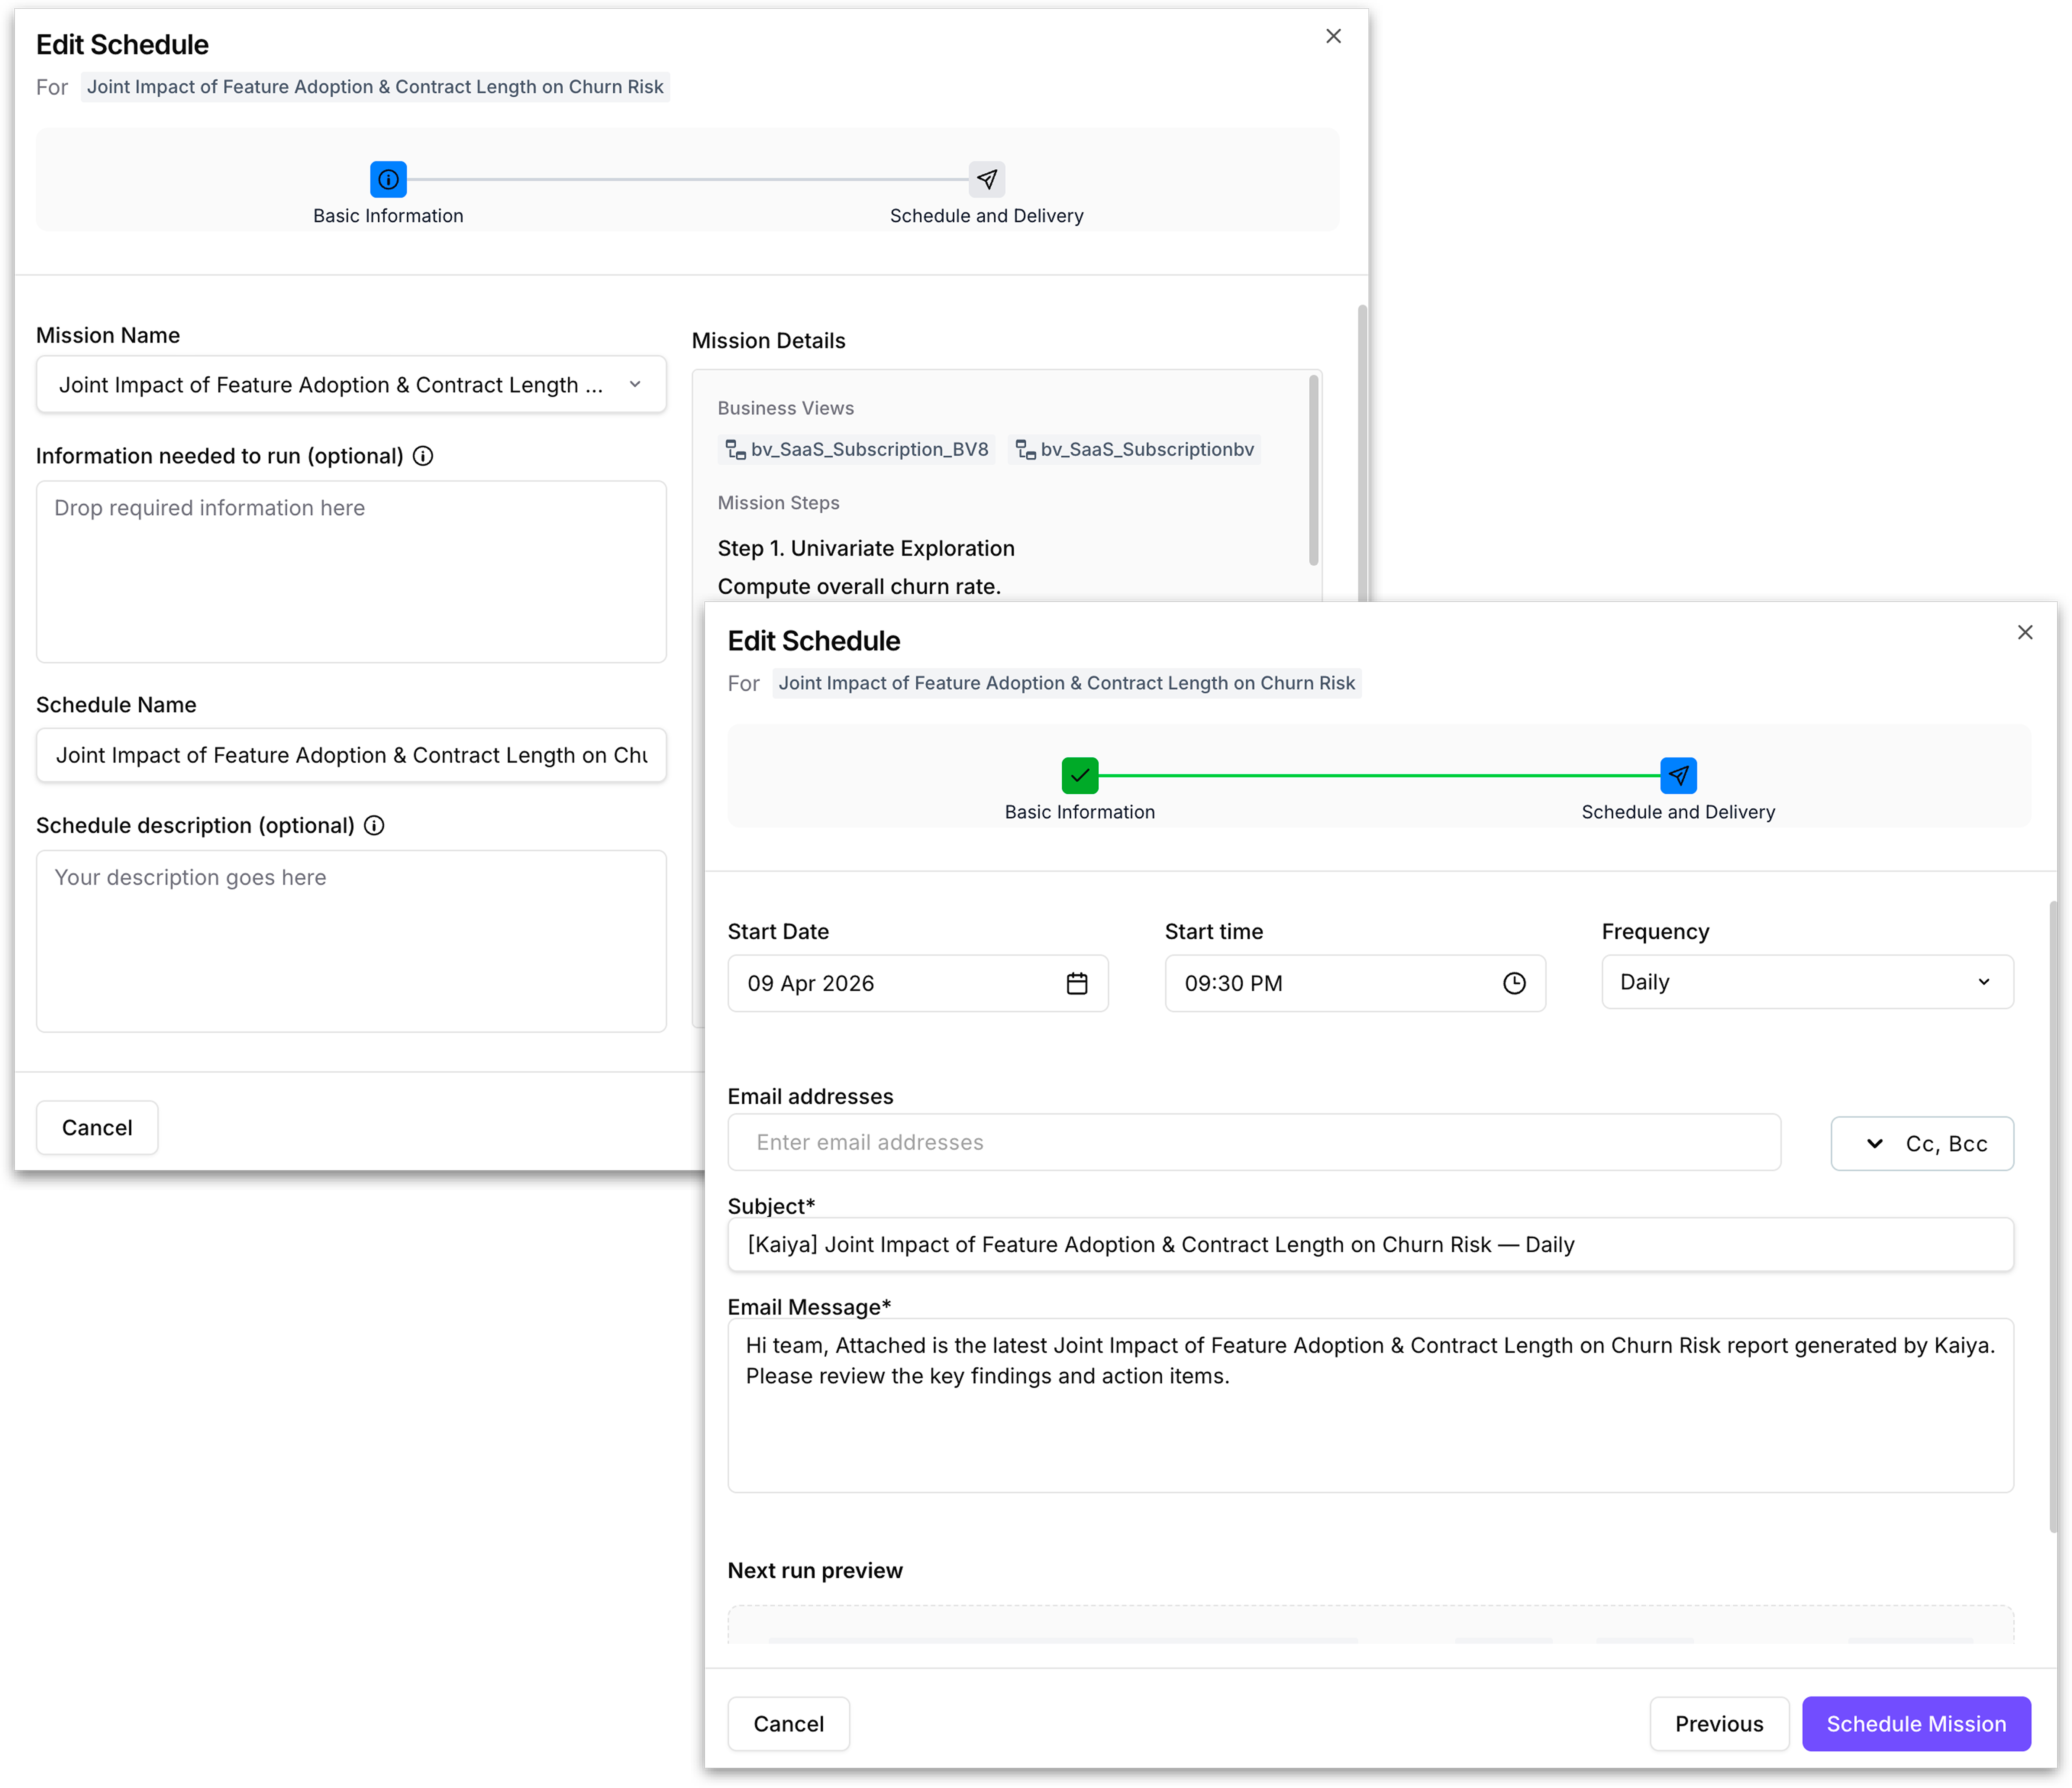
Click the **Schedule** button at the top right to open the **Create new schedule** wizard. This is a two-step flow.
#### **Step 1: Basic Information**
Configure what the schedule is for:
* **Mission Name:** pick the Mission this schedule should run. Once you select one, its details appear in the **Mission Details** panel on the right.
* **Information needed to run (optional):** provide any runtime inputs the Mission needs (brand, territory, time frame, etc.).
* **Schedule Name:** give the schedule a name. This is what shows up in the **Schedule** column on the table and in the Available Mission Schedules card grid.
* **Schedule description (optional):** a short note describing what the schedule is for.
Click **Next** to move to Step 2.
#### **Step 2: Schedule and Delivery**
Configure the cadence and how results are delivered:
* **Start Date:** the date the first run should happen.
* **Start time:** the time of day the run should happen.
* **Frequency:** how often the Mission should run.
* **Email addresses:** recipients of the output email. Use the **Cc, Bcc** dropdown to add carbon-copy and blind carbon-copy recipients.
* **Subject:** a subject line for the notification email (required).
* **Email Message:** the message body included in the email (required).
Click **Schedule Mission** to activate the schedule. The new schedule will appear in the table on the Scheduled Missions page and will also become available in the **Available Mission Schedules** card grid that other Missions can subscribe to.
For large outputs, export generation runs as a background job with pagination support, so the artifact is processed without blocking. Progress is tracked in the background, and the recipient is notified when the artifact is ready.
The scheduled run uses the output format configured in the Mission's **Outputs** tab (PowerPoint, PDF, or DOCX) and attaches it to the delivery email on every run.
{% hint style="info" %}
A single schedule can be reused across multiple Missions. If you've already created a schedule that fits a new Mission's cadence, subscribe to it from within that Mission's **Schedule** tab instead of creating a duplicate.
{% endhint %}
To inspect how a scheduled Mission has performed over time, open the Mission and go to the **History** tab in the **Mission Draft Editor**. For scheduled Missions, it shows **Total Runs**, **Success Rate**, and **Average Duration** as headline metrics, with a per-run log listing each execution's job name, status, start and end time, duration, output summary, and timestamp.
---
# Agent Instructions
This documentation is published with GitBook. GitBook is the documentation platform designed so that both humans and AI agents can read, navigate, and reason over technical content effectively. Learn more at gitbook.com.
## Querying This Documentation
If you need additional information that is not directly available in this page, you can query the documentation by asking a question.
Perform an HTTP GET request on the following URL with the `ask` and `goal` query parameters:
```
GET https://help.tellius.com/tellius-6.4/kaiya/kaiya-missions/scheduling-missions.md?ask=&goal=
```
`ask` is the immediate question: it should be specific, self-contained, and written in natural language.
`goal` is what the user is ultimately trying to achieve, the reason they need the answer. Sharing it helps GitBook give you a better, more relevant answer. A goal is most helpful when it describes the outcome the user wants rather than restating the question. For example, with `ask=how do I create an API token`, a goal like `automate deployments from our CI pipeline` lets GitBook tailor the answer to that use case.
The response will contain a direct answer to the question and relevant excerpts and sources from the documentation.
Use this mechanism when the answer is not explicitly present in the current page, you need clarification or additional context, or you want to retrieve related documentation sections.