> For the complete documentation index, see [llms.txt](https://help.tellius.com/llms.txt). Markdown versions of documentation pages are available by appending `.md` to page URLs; this page is available as [Markdown](https://help.tellius.com/tellius-6.4/settings/security/sso-configuration/saml.md).
# SAML
Learn how to configure SAML 2.0 authentication with your IdP (Okta, Azure AD, OneLogin) for secure Single Sign-On and automatic user provisioning.
### Configuring SAML Authentication in Tellius
Tellius supports SAML 2.0 as a secure, enterprise-grade authentication method. By integrating your organization’s Identity Provider (IdP) such as Okta, OneLogin, or Azure AD, users can log in to Tellius using Single Sign-On (SSO) credentials they already use within your enterprise environment.
Steps to configure Tellius in the different identity providers and get the metadata XML file is described in this [**section**](/tellius-6.4/settings/security/sso-configuration/saml/using-okta-as-an-idp-saml-integration.md).
### What is SAML?
SAML (Security Assertion Markup Language) is an XML-based open standard for exchanging authentication and authorization data between parties—specifically between an IdP and a Service Provider like Tellius.
When enabled:
* Tellius no longer manages login credentials directly.
* Authentication requests are routed to your IdP.
* Users are automatically created in Tellius on first login.
* Users are authenticated using your existing identity system.
### Prerequisites
Before configuring SAML on Tellius, make sure you have:
1. Access to Tellius with Admin privileges and access to your IdP admin dashboard (e.g., Okta, OneLogin).
2. A valid [SAML metadata XML](/tellius-6.4/settings/security/sso-configuration/saml/xml-file.md) file that includes:
* IdP Entity ID
* IdP Login URL (Single Sign-On URL)
* IdP Logout URL
* X.509 Certificate
Your internal IT team typically provides this metadata file, or you can generate it from your IdP during setup. For clarifications during setup, contact your internal SAML team, or reach out to Tellius Support.
### Upload SAML Configuration in Tellius
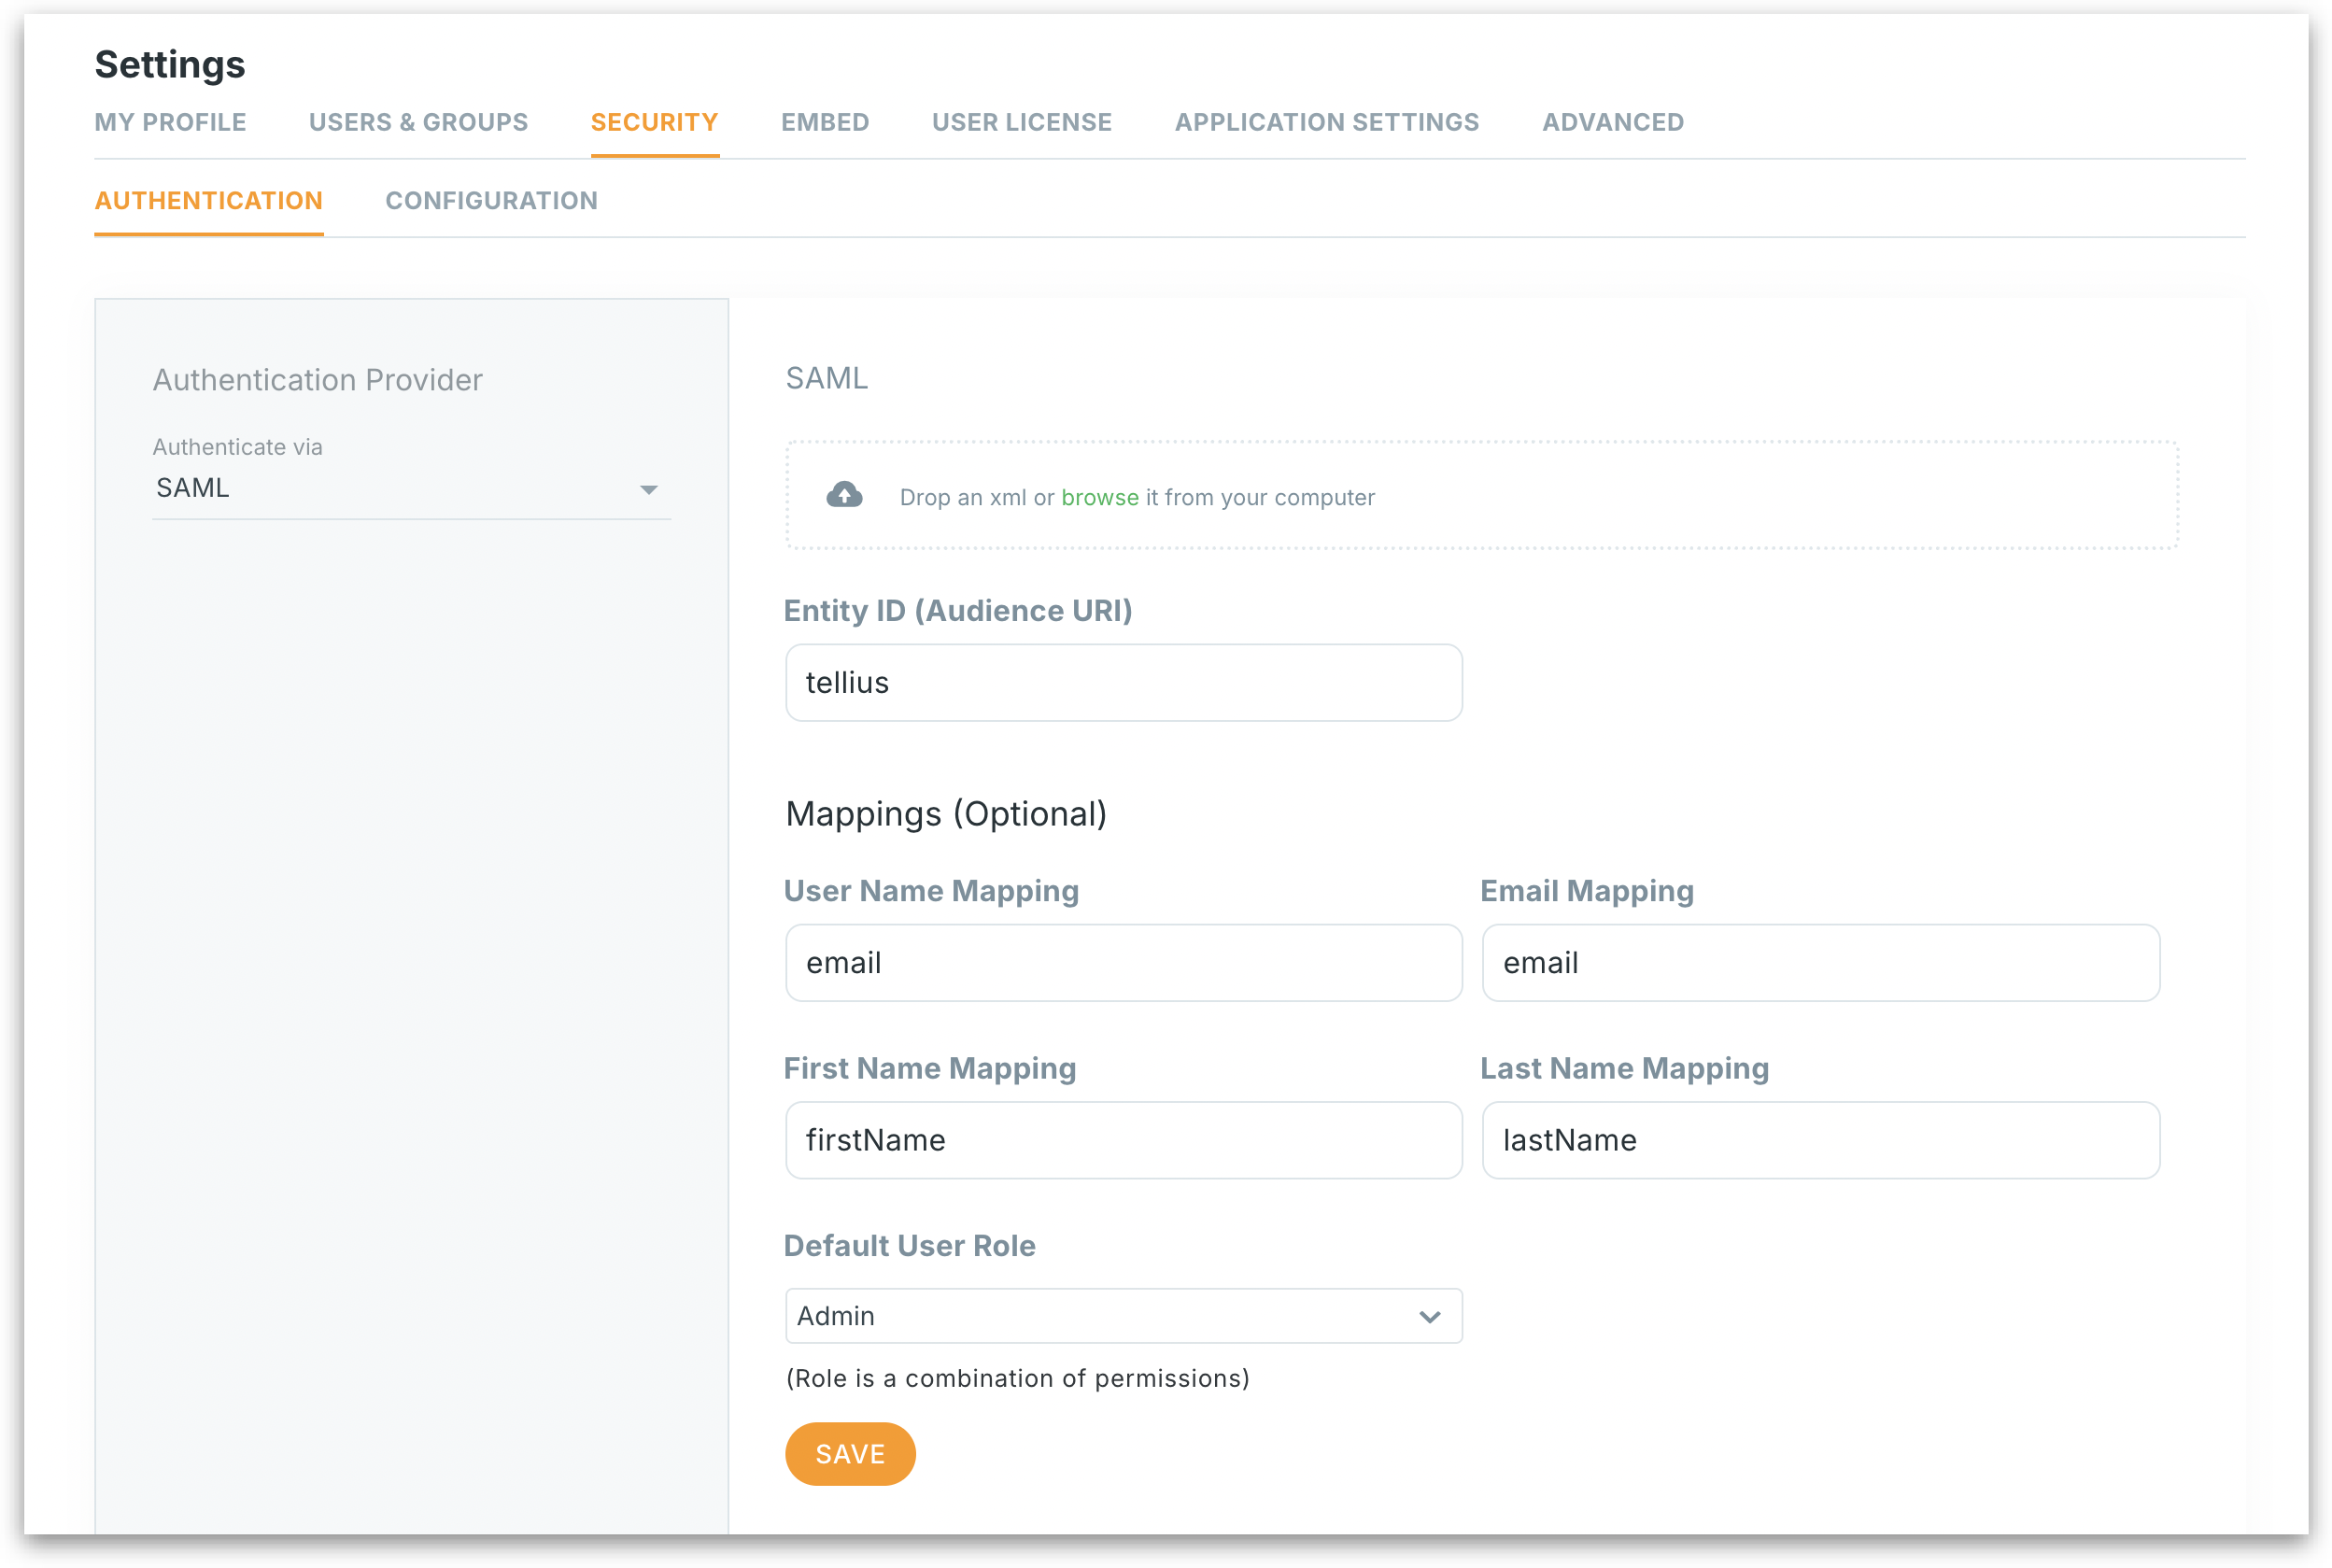
Under **Settings → Workspace → Security → SSO Configuration**, choose **SAML** in **Authenticate via**, then provide the following details. In releases before Tellius 6.4, this was **Settings → Security → Authentication → SAML**.
SAML
In Tellius 6.4 the **SAML** panel has these fields, from top to bottom. Fields marked with an asterisk (\*) on screen are required.
1. **Upload SAML metadata XML file:** A drop zone ("Drop SAML metadata XML here, or click to browse") for your IdP's metadata file. It takes one `.xml` file of up to 10 MB. Once a file is added, its name shows in place of the drop zone with a **Remove** button. If the file isn't valid XML, Tellius shows "Please up load a valid xml file."
2. **Entity ID (Audience URI)** (required): The unique identifier for Tellius as the Service Provider. It must match the Audience URI value set up in your IdP.
3. **SSO URL**, **Certificate** and **Issuer** (required): The IdP's single sign-on (login) URL, its X.509 signing certificate and its issuer (the IdP entity ID). These three fields show when **Enable New SAML Flow** is turned on under **Settings → Workspace → Security → Security Policies**.
**Mappings (Optional)** connects the user details that your IdP sends at sign-in to Tellius user profiles. The values must exactly match the attribute names your IdP sends.
4. **User Name Mapping:** The IdP attribute that identifies the user (usually email or username).
5. **Email Mapping:** The attribute in your IdP that stores the user's email.
6. **First Name Mapping:** The attribute for the user's first name.
7. **Last Name Mapping:** The attribute for the user's last name.
8. **Default User Role:** The role assigned to all new users signing in via SAML for the first time. The list holds the built-in roles and any [custom roles](https://help.tellius.com/settings/users-and-access/custom-roles).
{% hint style="info" %}
**When can you leave the mappings empty?** **Save** stays unavailable until **Entity ID** is filled in (and, with the new SAML flow, **SSO URL**, **Certificate** and **Issuer**). The four mapping fields can be left empty only when you upload a metadata file; without a file, fill in all four. Filling them in is still recommended, so new users get a complete profile.
{% endhint %}
Select **Save** at the top right of the page. A **Confirm** dialog asks "Are you sure?"; select **Confirm** to apply the SAML settings, or **Cancel** to go back to the form. **Cancel** next to **Save** discards your changes. Once saved, Tellius is set to use SAML for authentication.
{% hint style="info" %}
In releases before Tellius 6.4, the form listed the mappings as **Username mapping**, **Email**, **First Name**, **Last Name** and **Default user role**.
{% endhint %}
### How SAML login works in Tellius
* Users visiting the Tellius login page will see a **“Login”** button.
* Clicking the button redirects them to the SAML IdP (e.g., Okta) for authentication.
* If it’s the user’s first login, Tellius will automatically create the user account based on SAML attributes.
* No password setup or user creation is required within Tellius itself.
---
# Agent Instructions
This documentation is published with GitBook. GitBook is the documentation platform designed so that both humans and AI agents can read, navigate, and reason over technical content effectively. Learn more at gitbook.com.
## Querying This Documentation
If you need additional information that is not directly available in this page, you can query the documentation by asking a question.
Perform an HTTP GET request on the following URL with the `ask` and `goal` query parameters:
```
GET https://help.tellius.com/tellius-6.4/settings/security/sso-configuration/saml.md?ask=&goal=
```
`ask` is the immediate question: it should be specific, self-contained, and written in natural language.
`goal` is what the user is ultimately trying to achieve, the reason they need the answer. Sharing it helps GitBook give you a better, more relevant answer. A goal is most helpful when it describes the outcome the user wants rather than restating the question. For example, with `ask=how do I create an API token`, a goal like `automate deployments from our CI pipeline` lets GitBook tailor the answer to that use case.
The response will contain a direct answer to the question and relevant excerpts and sources from the documentation.
Use this mechanism when the answer is not explicitly present in the current page, you need clarification or additional context, or you want to retrieve related documentation sections.