> For the complete documentation index, see [llms.txt](https://help.tellius.com/llms.txt). Markdown versions of documentation pages are available by appending `.md` to page URLs; this page is available as [Markdown](https://help.tellius.com/tellius-documentation/data/create-new-datasource/connecting-to-google-cloud-sql/connecting-to-a-postgresql-cloud-sql-instance.md).
# Connecting to a PostgreSQL cloud SQL instance
Connect to a PostgreSQL Cloud SQL instance step-by-step. Configure IP, networking, and credentials to link your database for seamless analytics.
### **Prerequisites**
Ensure that you have an existing GCP Cloud PostgreSQL instance.
### **Steps to follow**
1. Go to [this link](http://console.cloud.google.com/sql/instances) where the list of instances will be displayed.
2. Select the required instance from the existing list.
3. If you do not have an existing instance, click on **Create Instance** to create one.
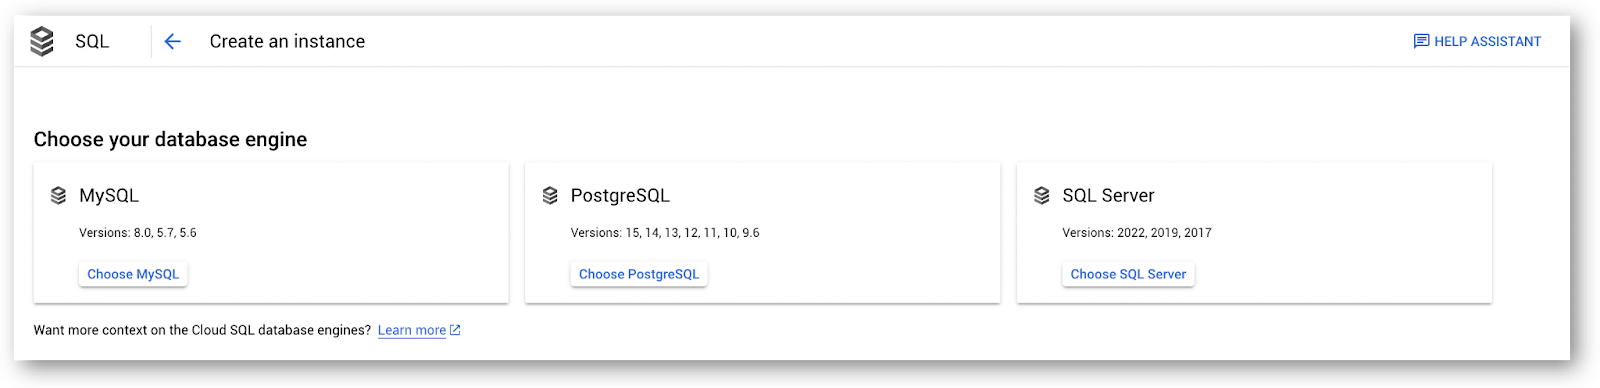
4. On the **Create an instance** page, choose PostgreSQL database engine from the list.
Creating an instance
5. In the **Primary Instance** pane on the left side, select **Connections** and click on the **Networking** tab.
6. Under **Instance IP assignment**, click on the **Public IP** checkbox.
Selecting Public IP
7. Click on **Add a network** under the **Authorized networks** section. **New network** section will open.
Adding a new network
8. Provide a **Name** and **IP address** in the respective fields. Click on **Done** and click on **Save**.
{% hint style="info" %}
Please note that the IP address in CIDR notation will be provided by the Tellius team.
{% endhint %}
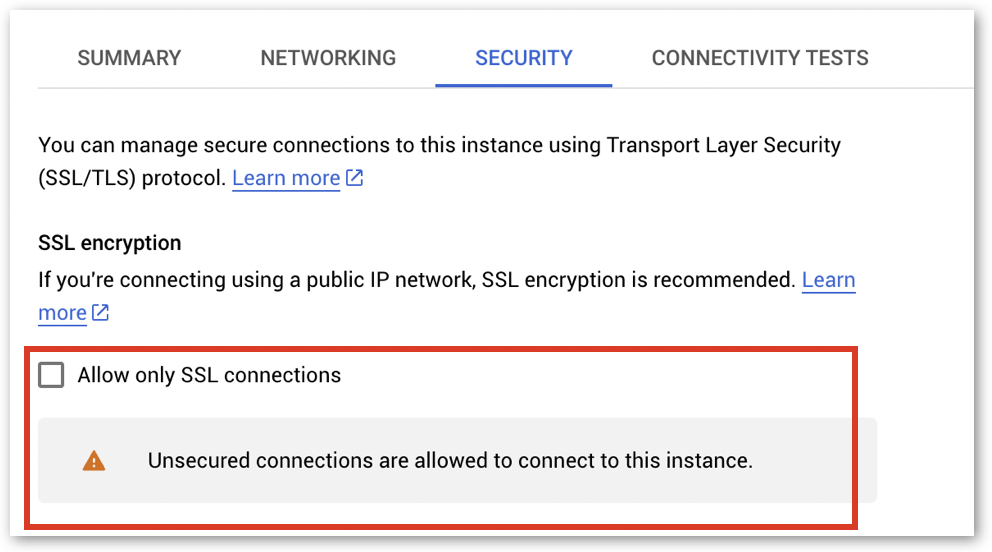
9. Under the **Security** tab, ensure that the checkbox **Allow only SSL connections** is left unchecked.
Unchecking "SSL connections"
{% hint style="info" %}
If *Only secured connections are allowed to connect to this instance* is displayed, click on **Allow unsecured connections**.\
\
If *Unsecured connections are allowed to connect to this instance* is displayed, you do not need to change anything.
{% endhint %}
10. From the GCP console, please note the following details, as they will be required when setting up the connection on the Tellius platform:
* Under the **Summary** tab, copy the Public IP address.
Copying the public IP address
* In the **Primary Instance** pane, select **Databases**. From the list of databases, copy the name of the required database.
* In the **Primary Instance** pane, select **Users**. From the list of users, copy the name of the required user.
11. In the Tellius platform, navigate to **Data → Connect → Create New → PostgreSQL**.
Data → Connect → Create New → PostgreSQL
12. Paste the IP address in the **Hostname** field.
13. Provide the default port number 5432 in the **Port** field.
14. Paste the copied database name in the **Database** field.
15. Paste the copied user name in the **User** field.
16. Provide the required password in the **Password** field.
17. Click on **Save and Browse Host** (or **Browse Host** if you are using an already established connection). The list of tables from the data source will be displayed on the right side.
After establishing a connection
---
# Agent Instructions
This documentation is published with GitBook. GitBook is the documentation platform designed so that both humans and AI agents can read, navigate, and reason over technical content effectively. Learn more at gitbook.com.
## Querying This Documentation
If you need additional information that is not directly available in this page, you can query the documentation by asking a question.
Perform an HTTP GET request on the following URL with the `ask` and `goal` query parameters:
```
GET https://help.tellius.com/tellius-documentation/data/create-new-datasource/connecting-to-google-cloud-sql/connecting-to-a-postgresql-cloud-sql-instance.md?ask=&goal=
```
`ask` is the immediate question: it should be specific, self-contained, and written in natural language.
`goal` is what the user is ultimately trying to achieve, the reason they need the answer. Sharing it helps GitBook give you a better, more relevant answer. A goal is most helpful when it describes the outcome the user wants rather than restating the question. For example, with `ask=how do I create an API token`, a goal like `automate deployments from our CI pipeline` lets GitBook tailor the answer to that use case.
The response will contain a direct answer to the question and relevant excerpts and sources from the documentation.
Use this mechanism when the answer is not explicitly present in the current page, you need clarification or additional context, or you want to retrieve related documentation sections.