> For the complete documentation index, see [llms.txt](https://help.tellius.com/llms.txt). Markdown versions of documentation pages are available by appending `.md` to page URLs; this page is available as [Markdown](https://help.tellius.com/vizpads-explore/actions-in-view-mode/exporting-charts-and-vizpads/how-to-export-more-than-100-000-rows.md).
# How to export more than 100,000 rows
Export more than 100,000 rows from a Vizpad table in successive batches
A single export from a Vizpad chart returns a maximum of 100,000 rows. When your filtered result set is larger than that, you retrieve the remaining rows by requesting successive batches. Tellius keeps track of how many rows you have already pulled.
This page walks through the full workflow:
1. Exporting the first batch
2. Retrieving the file
3. Requesting each additional batch
4. Verifying the batches before you combine them.
{% hint style="warning" %}
When your result set exceeds 100,000 rows, the export stops at 100,000 rows and the file arrives as usual. Always check the row range in the file name before you treat an export as final.
{% endhint %}
## Before you start
**Set your filters first.** An export always reflects the filters that are currently applied to the Vizpad. If you have **Global Pinned Filters** set (for example, a single territory and a single brand) the exported file contains only the rows that match those filters. Confirm your filter selections before you begin, because changing a filter partway through a batch export will produce files that describe different populations.
**Every exported workbook records its own filters.** The exported Excel file includes a separate tab that lists the filters applied to that export. This tab lets you confirm the scope of any export after the fact, and it is what makes a multi-batch export defensible during reconciliation or audit.
### Step 1: Open the chart menu
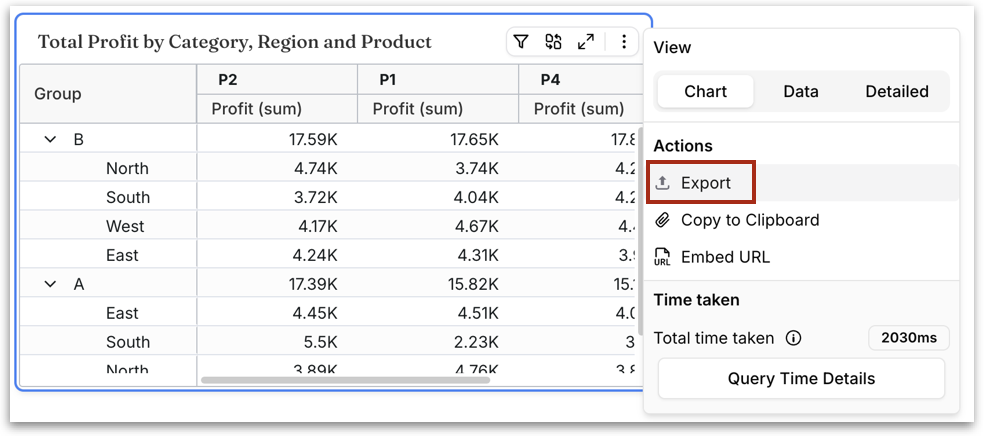
On the chart/table you want to export, click the three-dot menu ( ⋮ ) at the top-right corner. Under **Actions**, select **Export**.
{% hint style="warning" %}
Use the three-dot menu on the chart/table, not the three-dot menu in the page header at the very top-right of the screen (this applies to the whole Vizpad).
{% endhint %}
### Step 2: Choose the scope and format
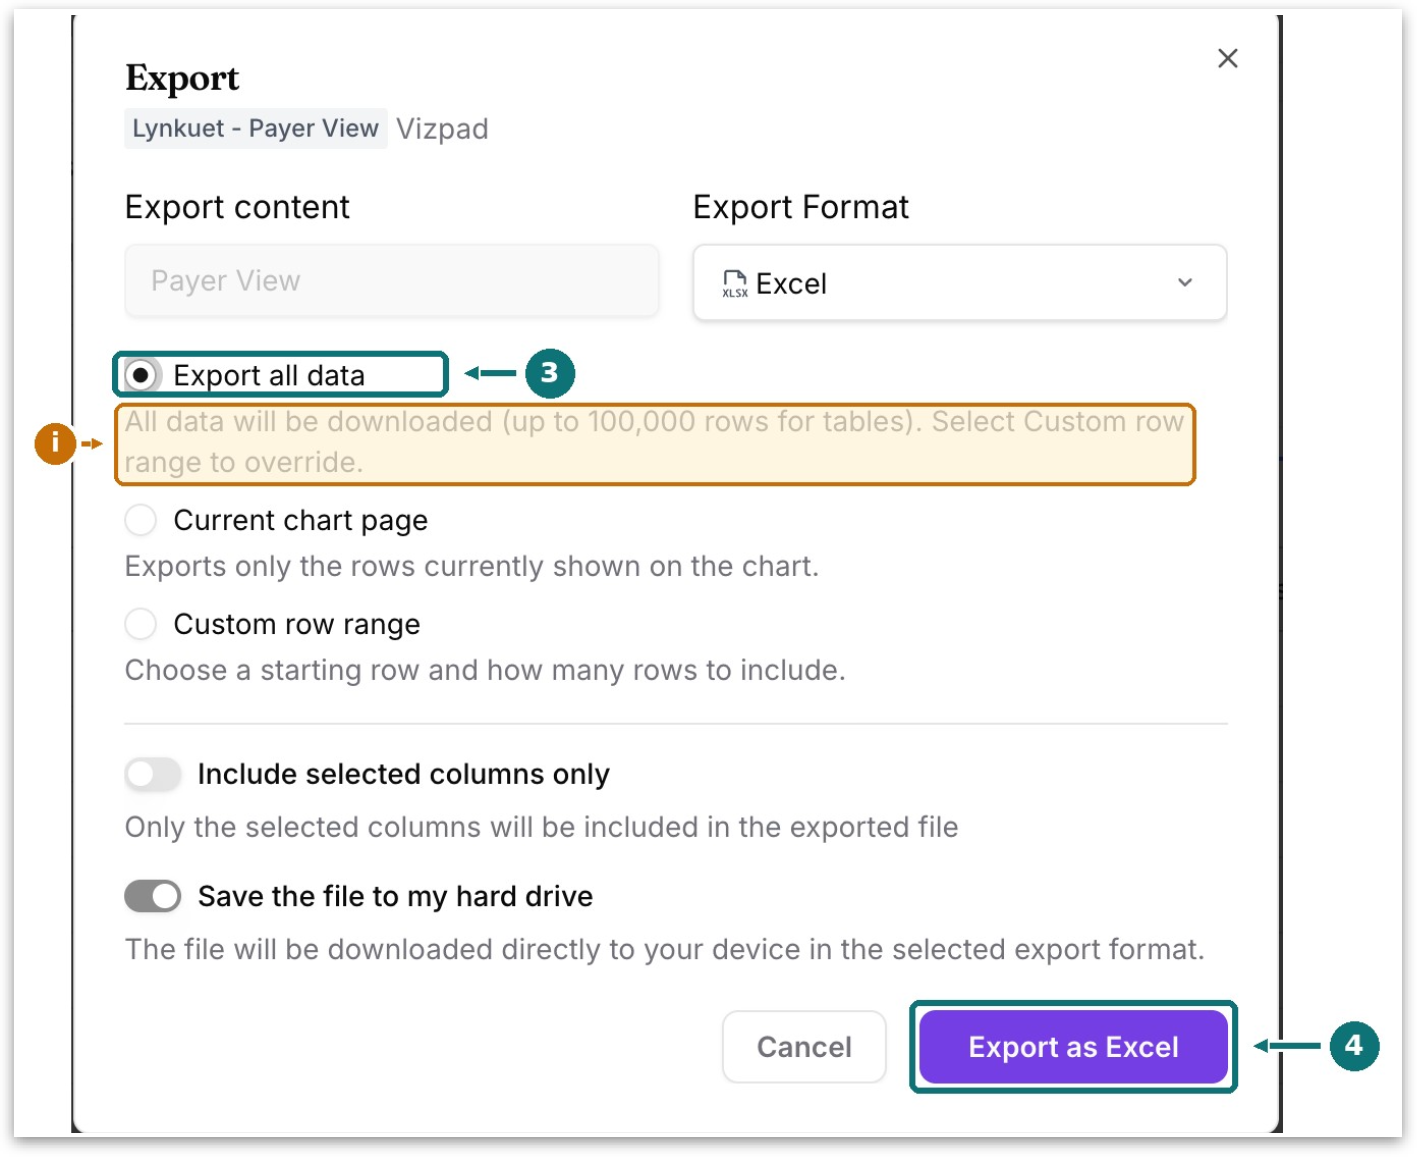
The Export dialog opens. Keep **Export all data** selected, which is the default. Confirm that **Export Format** is set to **Excel**, then click **Export as Excel**.
The dialog contains the following controls.
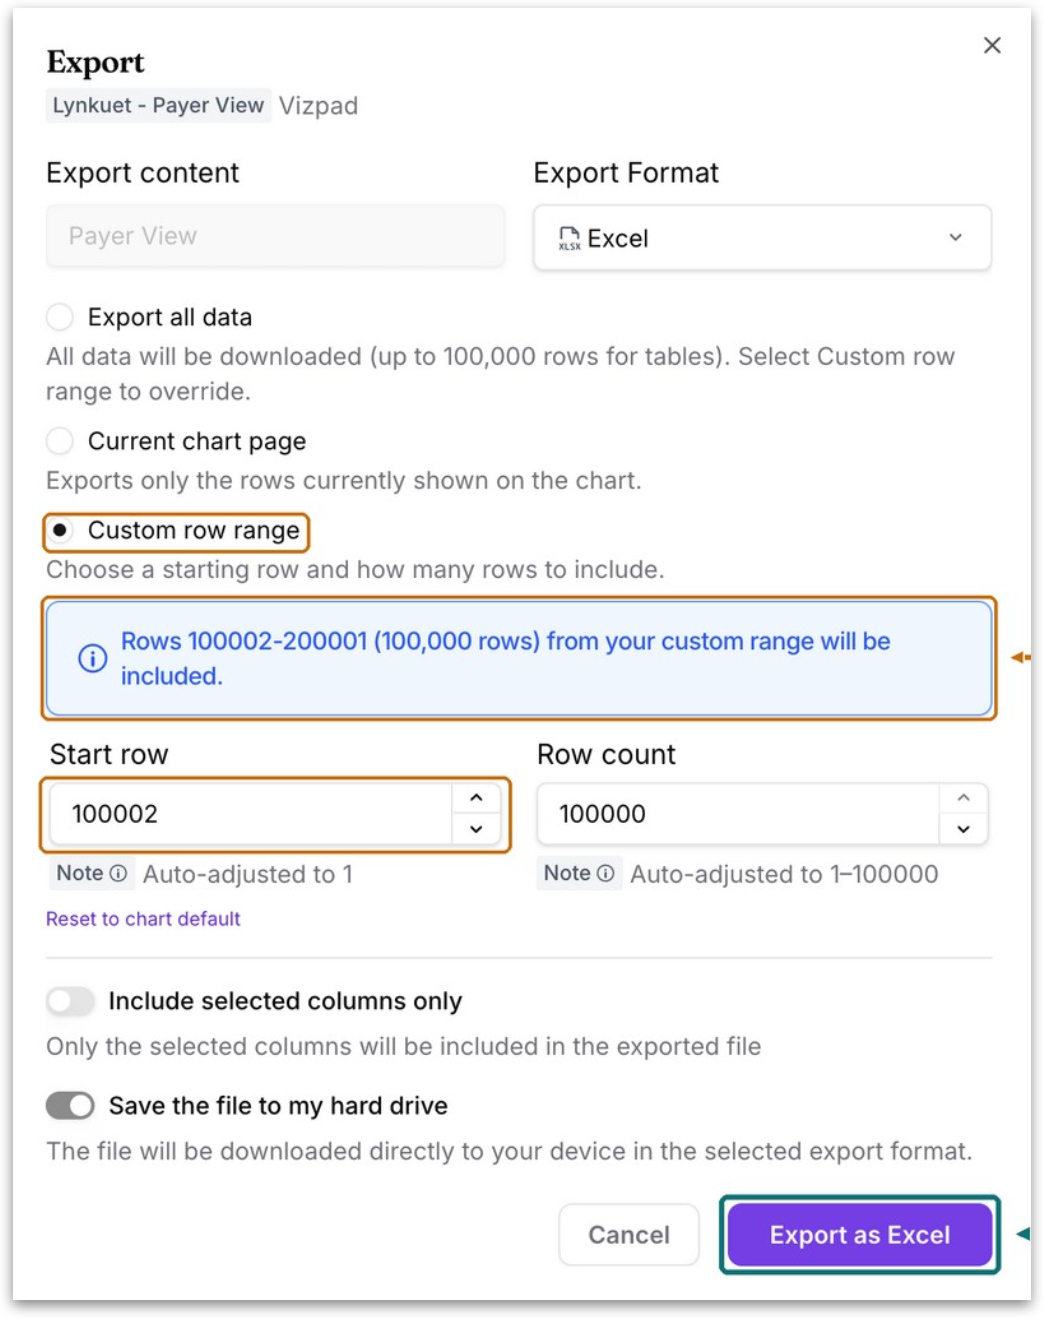
* **Export content** displays the name of the source chart/table. This field is read-only. It reflects the chart/table you launched the export from, and it cannot be changed here.
* **Export Format** sets the file format for the export.
* **Export all data** downloads all data, up to 100,000 rows for tables. To override that range, select **Custom row range** instead.
* **Current chart page** exports only the rows currently shown on the chart.
* **Custom row range** lets you choose a starting row and how many rows to include.
* **Include selected columns only** limits the export to the columns you have selected. When this is switched off, the export includes every column.
* **Save the file to my hard drive** downloads the file directly to your device in the selected format.
{% hint style="warning" %}
If **Save the file to my hard drive** is switched off, the export completes but no file arrives. This is the most common reason a user reports that an export did not work.
{% endhint %}
### Step 3: Track the queued job
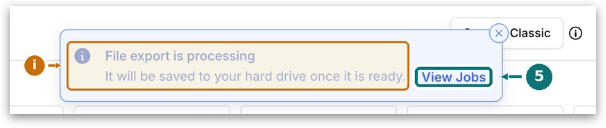
A confirmation appears at the top of the screen: *File export is processing. It will be saved to your hard drive once it is ready.* Large exports are queued and processed in the background, so you can keep working while the job runs. Click **View Jobs** to monitor progress.
### Step 4: Confirm the download and read the file name
When the job completes, Tellius displays an in-app confirmation, and your browser places the file in its **Downloads** list.
{% hint style="success" %}
**The file name records exactly which rows the file contains.** A file name containing `..._r1-100000_...` holds rows 1 through 100,000. This is the record of a file's contents, so do not rename exported files until you have reconciled them.
{% endhint %}
{% hint style="warning" %}
**Download more**, which appears in the in-app confirmation, queues the next batch immediately. It performs the same action as **Export next set** in the job list, described in Step 5. You can use either one of them.
{% endhint %}
### Step 5: Find the job and request the next batch
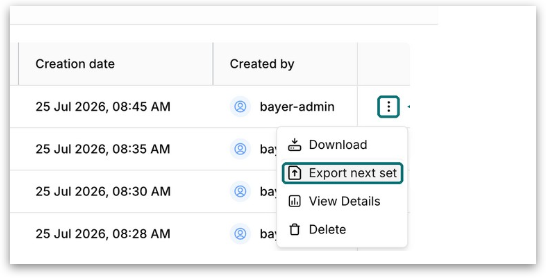
If the confirmation has already dismissed itself, go to **Notifications → On demand jobs**. Locate your export in the list, click the three-dot menu ( ⋮ ) at the end of that row, and select **Export next set**.
{% hint style="warning" %}
Several rows in the job list can share the same object name and job type. Multiple exports of the same card, run within minutes of each other, are distinguishable only by the **Creation date** column. Match that column to the time you started your export before you open the row menu.\
\
To narrow the list, set **Job Type** to **Vizpad Data Export** and sort by **Creation date**.
{% endhint %}
### Step 6: Export the next batch
The Export dialog reopens with **Custom row range** already selected and the range already filled in. In a second batch, **Start row** reads 100002 and **Row count** reads 100000. A banner confirms the range in plain language. Click **Export as Excel**.
### Step 7: Confirm the second batch
The confirmation appears again, and the new file lands in your Downloads list with the next row range in its name, such as `..._r100002-200001_...`.
Keep every batch file and leave the names intact. Together, the file names are the audit trail for what you exported.
{% hint style="success" %}
Repeat Steps 5 through 7 until the batch you receive contains fewer than 100,000 rows. A short batch means you have reached the end of the result set.
{% endhint %}
## Verifying a multi-batch export
Tellius builds a complete audit trail into every batch export.
**1. Use the row count to confirm where the result set ends**
Each file name records the row range you requested, such as `r100002-200001`. This gives you a precise, permanent record of every request in the sequence.
The delivered row count tells you where the data itself ends. When a batch returns fewer rows than the range you requested, you have reached the end of the result set. A noticeably smaller file is your signal that the export is complete.
Open each file and note the row count. Together with the file name, this gives you both what you asked for and what the data contained.
**2. Confirm continuity at the batch boundaries**
The naming convention makes continuity easy to verify. Consecutive files are named `r1-100000` and `r100002-200001`, so the sequence is visible at a glance.
Open two consecutive files and check that the last row of one batch and the first row of the next are consecutive records. This confirms your batches line up end to end before you combine them.
**3. Confirm the filter scope across every batch**
Every exported workbook includes a separate tab listing the filters applied to that export. This built-in manifest means the scope of each file is documented in the file itself, with nothing to reconstruct afterward.
If the Vizpad filters were adjusted between batches, the tabs will show it, and the files describe different populations.
---
# Agent Instructions
This documentation is published with GitBook. GitBook is the documentation platform designed so that both humans and AI agents can read, navigate, and reason over technical content effectively. Learn more at gitbook.com.
## Querying This Documentation
If you need additional information that is not directly available in this page, you can query the documentation by asking a question.
Perform an HTTP GET request on the following URL with the `ask` and `goal` query parameters:
```
GET https://help.tellius.com/vizpads-explore/actions-in-view-mode/exporting-charts-and-vizpads/how-to-export-more-than-100-000-rows.md?ask=&goal=
```
`ask` is the immediate question: it should be specific, self-contained, and written in natural language.
`goal` is what the user is ultimately trying to achieve, the reason they need the answer. Sharing it helps GitBook give you a better, more relevant answer. A goal is most helpful when it describes the outcome the user wants rather than restating the question. For example, with `ask=how do I create an API token`, a goal like `automate deployments from our CI pipeline` lets GitBook tailor the answer to that use case.
The response will contain a direct answer to the question and relevant excerpts and sources from the documentation.
Use this mechanism when the answer is not explicitly present in the current page, you need clarification or additional context, or you want to retrieve related documentation sections.