> For the complete documentation index, see [llms.txt](https://help.tellius.com/llms.txt). Markdown versions of documentation pages are available by appending `.md` to page URLs; this page is available as [Markdown](https://help.tellius.com/embedding-tellius/embedding-url/embedding-search.md).
# Embedding Search
Using the following steps, you can embed (using iFrame) components of Tellius (Vizpads, Insights, Search) into your app.
{% hint style="info" %}
The **embedded app** refers to Tellius, whereas the **embedding app** refers to the app in which Tellius components are to be integrated.
{% endhint %}
1. Get the embedding URL from Tellius.
2. Include the embedding URL in the HTML of the required app.
3. Connect the app with Tellius.
### **Getting the embedding URL**
1. Navigate **Settings → Embed → Search**.
URL from Settings page
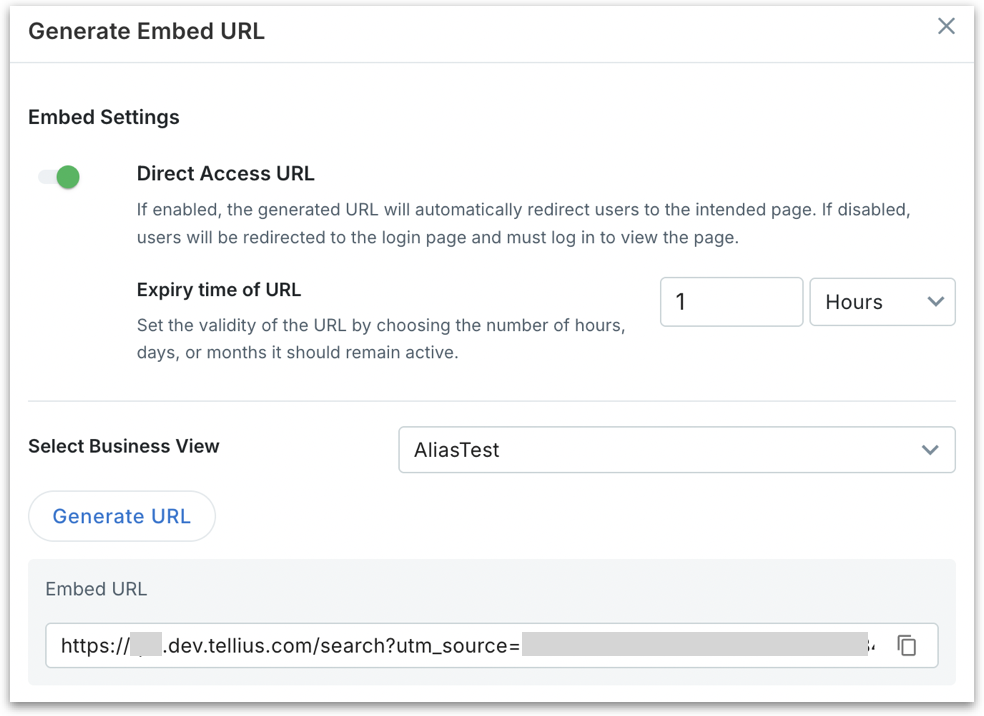
2. Click on **Generate Embed URL**. The following window will be displayed.
Generating Embed URL
### **Direct Access URL (toggle):**
When enabled, users accessing the embedded URL are taken directly to the embedded Search interface (no login prompt). This only works when the token (passed via `utm_source`) has valid session context.
When disabled, users will be redirected to the Tellius login screen before reaching the embedded component. Use this when you want user-level authentication to be enforced on access.
**Expiry Time of URL:** Controls how long the generated embedding URL remains valid. Specify the duration in hours, days, or months. After the set time, the token (`utm_source` or similar context ID) expires, and the link becomes invalid.
**Select Business View:** Choose the Business View (BV) in which the search queries should execute.
Click on the **Copy** icon to copy the embedding URL.
### **Including the obtained URL**
An embedding URL looks like the following:
`https://domain/search?utm_source=ID`
Once you embed the URL, the Search page will be loaded.
If you want to deploy row-level permissions to the embedded Search, ensure that appropriate user-level policies are configured.
### **Connecting with Tellius**
1. The embedding app needs to send a message `INITIALIZE` to connect with Tellius.
2. Tellius validates and responds with `TELLIUS_INITIALIZED` message as an acknowledgment.
The following is a sample code to connect with Tellius:
```javascript
var telliusFrame ;
document.querySelector("iframe").addEventListener("load", function() {
telliusFrame = document.getElementsByTagName("iframe")[0].contentWindow;
telliusFrame.postMessage('INITIALIZE', "*");
})
function receiveMessage(event) {
if(event.data === 'TELLIUS_INITIALIZED') {
telliusFrame.postMessage({ //if you want to include an actionType
actionType: "required_actionType",
}, "*");
}
}
window.addEventListener("message", receiveMessage, false);
```
As furnished in the code above, we use `window.postMessage` for communication between Tellius and the embedding app (two-way communication). The messages which are sent to Tellius from the embedding app are included in `telliusFrame.postMessage()`. With the help of the function `postMessage`, required actions can be performed.
To enable this communication and to receive messages, the embedding app needs to have `eventListener`. For every point clicked, or area selected/highlighted in the chart, Tellius will send a message to the embedding app.
---
# Agent Instructions
This documentation is published with GitBook. GitBook is the documentation platform designed so that both humans and AI agents can read, navigate, and reason over technical content effectively. Learn more at gitbook.com.
## Querying This Documentation
If you need additional information that is not directly available in this page, you can query the documentation dynamically by asking a question.
Perform an HTTP GET request on the current page URL with the `ask` query parameter, and the optional `goal` query parameter:
```
GET https://help.tellius.com/embedding-tellius/embedding-url/embedding-search.md?ask=&goal=
```
`ask` is the immediate question: it should be specific, self-contained, and written in natural language.
`goal` is optional and describes the broader end goal you are ultimately trying to accomplish on behalf of the user. GitBook uses it to tailor the answer towards what is most useful for that goal.
The response will contain a direct answer to the question and relevant excerpts and sources from the documentation.
Use this mechanism when the answer is not explicitly present in the current page, you need clarification or additional context, or you want to retrieve related documentation sections.