Tellius
  • ๐ŸšฉGetting Started
    • ๐Ÿ‘‹Say Hello to Tellius
      • Glossary
      • Tellius 101
      • Navigating around Tellius
      • Guided tours for quick onboarding
    • โšกQuick Start Guides
      • Search
      • Vizpads (Explore)
      • Insights (Discover)
    • โœ…Best Practices
      • Search
      • Vizpads (Explore)
      • Insights (Discover)
      • Predict
      • Data
    • โฌ‡๏ธInitial Setup
      • Tellius architecture
      • System requirements
      • Installation steps for Tellius
      • Customizing Tellius
    • Universal Search
    • ๐Ÿ Tellius Home Page
  • Kaiya
    • โ™Ÿ๏ธUnderstanding AI Agents & Agentic Flows
      • Glossary
      • Composer
      • ๐Ÿ—๏ธTriggering an agentic workflow
      • The art of possible
      • Setting up LLM for Kaiya
    • ๐ŸคนKaiya conversational AI
      • โ“FAQs on Kaiya Conversations
      • Triggering Insights with "Why" questions
      • Mastering Kaiya conversational AI
  • ๐Ÿ”Search
    • ๐Ÿ‘‹Get familiar with our Search interface
    • ๐Ÿค”Understanding Tellius Search
    • ๐Ÿ“Search Guide
    • ๐Ÿš€Executing a search query
      • Selecting a Business View
      • Typing a search query
      • Constructing effective search queries
      • Marketshare queries
    • ๐Ÿ”‘Analyzing search results
      • Understanding search results
      • Search Inspector
      • Time taken to execute a query
      • Interacting with the resulting chart
    • ๐Ÿ“ŠKnow your charts in Tellius
      • Understanding Tellius charts
      • Variations of a chart type
      • Building charts from Configuration pane
      • List of chart-specific fields
      • Adding columns to fields in Configuration pane
      • Absolute and percentage change aggregations
      • Requirements of charts
      • Switching to another chart
      • Formatting charts
      • Advanced Analytics
      • Cumulative line chart
    • ๐Ÿง‘โ€๐ŸซHelp Tellius learn
    • ๐Ÿ•ต๏ธโ€โ™‚๏ธSearch history
    • ๐ŸŽ™๏ธVoice-driven search
    • ๐Ÿ”ดLive Query mode
  • ๐Ÿ“ˆVizpads (Explore)
    • ๐Ÿ™‹Meet Vizpads!
    • ๐Ÿ‘‹Get familiar with our Vizpads
    • #๏ธโƒฃMeasures, dimensions, date columns
    • โœจCreating Vizpads
    • ๐ŸŒApplying global filters
      • Filters in multi-BV Vizpads
      • Filters using common columns
    • ๐Ÿ“ŒApplying local filters
    • ๐Ÿ“…Date picker in filters
      • Customizing the calendar view
    • โœ…Control filters
      • Multi-select list
      • Single-select list
      • Range slider
      • Dropdown list
    • ๐Ÿ‘๏ธActions in View mode
      • Interacting with the charts
    • ๐Ÿ“Actions in Edit mode
      • ๐Ÿ—จ๏ธViz-level actions
    • ๐Ÿ”งAnomaly management for line charts
      • Instance level
      • Vizpad level
      • Chart level
    • โณTime taken to load a chart
      • Instance level
      • Vizpad level
      • Chart level
    • โ™Ÿ๏ธWorking with sample datasets
    • ๐Ÿ”Swapping Business View of charts
      • Swapping only the current Vizpad
      • Swapping multiple objects
      • Configuring the time of swap
    • ๐Ÿค–Explainable AI charts
  • ๐Ÿ’กInsights (Discover)
    • ๐Ÿ‘‹Get familiar with our Insights
    • โ“Understanding the types of Insights
    • ๐Ÿ•ต๏ธโ€โ™‚๏ธDiscovery Insights
    • โž•How to create new Insights
      • ๐Ÿ”›Creating Discovery Insight
      • ๐Ÿ”‘Creating Key Driver Insights
      • ใ€ฐ๏ธCreating Trend Insights
      • ๐Ÿ‘ฏCreating Comparison Insights
    • ๐ŸงฎThe art of selecting columns for Insights
      • โžก๏ธHow to include/exclude columns?
  • ๐Ÿ”ขData
    • ๐Ÿ‘‹Get familiar with our Data module
    • ๐Ÿฅ‚Connect
    • ๐ŸชนCreate new datasource
      • Connecting to Oracle database
      • Connecting to MySQL database
      • Connecting to MS SQL database
      • Connecting to Postgres SQL database
      • Connecting to Teradata
      • Connecting to Redshift
      • Connecting to Hive
      • Connecting to Azure Blob Storage
      • Connecting to Spark SQL
      • Connecting to generic JDBC
      • Connecting to Salesforce
      • Connecting to Google cloud SQL
        • Connecting to a PostgreSQL cloud SQL instance
        • Connecting to an MSSQL cloud SQL instance
        • Connecting to a MySQL Cloud SQL Instance
      • Connecting to Amazon S3
      • Connecting to Google BigQuery
        • Steps to connect to a Google BigQuery database
      • Connecting to Snowflake
        • OAuth support for Snowflake
        • Integrating Snowflake with Azure AD via OAuth
        • Integrating Snowflake with Okta via OAuth
        • Azure PrivateLink
        • AWS PrivateLink
        • Best practices
      • Connecting to Databricks
      • Connecting to Databricks Delta Lake
      • Connecting to an AlloyDB Cluster
      • Connecting to HDFS
      • Connecting to Looker SQL Interface
      • Loading Excel sheets
      • ๐ŸšงUnderstanding partitioning your data
    • โณTime-to-Live (TTL) and Caching
    • ๐ŸŒทRefreshing a datasource
    • ๐ŸชบManaging your datasets
      • Swapping datasources
    • ๐ŸฃPreparing your datasets
      • ๐ŸคพActions that can be done on a dataset
      • Data Pipeline
      • SQL code snippets
      • โœ๏ธWriteback window
      • ๐ŸงฉEditing Prepare โ†’ Data
      • Handling null or mismatched values
      • Metadata view
      • List of icons and their actions
        • Functions
        • SQL Transform
        • Python Transform
        • Standard Aggregation
        • Creating Hierarchies
      • Dataset Scripting
      • Fusioning your datasets
      • Scheduling refresh for datasets
    • ๐ŸฅPreparing your Business Views
      • ๐ŸŒŸCreate a new Business View
      • Creating calculated columns
      • Creating dynamic parameters
      • Scheduling refresh for Business Views
      • Setting up custom calendars
    • Tellius Engine: Comparison of In-Memory vs. Live Mode
  • Feed
    • ๐Ÿ“ฉWhat is a Feed in Tellius?
    • โ—Alerts on the detection of anomalies
    • ๐Ÿ“ฅViewing and deleting metrics
    • ๐Ÿ–ฒ๏ธTrack a new metric
  • Assistant
    • ๐Ÿ’Introducing Tellius Assistant
    • ๐ŸŽคVoice-based Assistant
    • ๐Ÿ’ฌInteracting with Assistant
    • โ†–๏ธSelecting Business View
  • Embedding Tellius
    • What you should know before embedding
    • Embedding URL
      • ๐Ÿ“ŠEmbedding Vizpads
        • Apply and delete filters
        • Vizpad-related actionTypes
        • Edit, save, and share a Vizpad
        • Keep, remove, drill sections
        • Adding a Viz to a Vizpad
        • Row-level policy filters
      • ๐Ÿ’กEmbedding Insights
        • Creating and Viewing Insights
      • ๐Ÿ”ŽEmbedding Search
        • Search query execution
      • Embedding Assistant
      • ๐Ÿช„Embedding Kaiya
      • Embedding Feed
  • API
    • Insights APIs
    • Search APIs
    • Authentication API (Login API)
  • โœจWhat's New
    • Release 5.4
      • Patch 5.4.0.x
    • Release 5.3
      • Patch 5.3.1
      • Patch 5.3.2
      • Patch 5.3.3
    • Release 5.2
      • Patch 5.2.1
      • Patch 5.2.2
    • Release 5.1
      • Patch 5.1.1
      • Patch 5.1.2
      • Patch 5.1.3
    • Release 5.0
      • Patch 5.0.1
      • Patch 5.0.2
      • Patch 5.0.3
      • Patch 5.0.4
      • Patch 5.0.5
    • Release 4.3 (Fall 2023)
      • Patch 4.3.1
      • Patch 4.3.2
      • Patch 4.3.3
      • Patch 4.3.4
    • Release 4.2
      • Patch 4.2.1
      • Patch 4.2.2
      • Patch 4.2.3
      • Patch 4.2.4
      • Patch 4.2.5
      • Patch 4.2.6
      • Patch 4.2.7
    • Release 4.1
      • Patch 4.1.1
      • Patch 4.1.2
      • Patch 4.1.3
      • Patch 4.1.4
      • Patch 4.1.5
    • Release 4.0
Powered by GitBook

ยฉ 2025 Tellius

On this page
  • How to set up custom calendars
  • When to use a Standard (ISO) calendar vs Fiscal calendar
  • Applying the custom calendar

Was this helpful?

Export as PDF
  1. Data
  2. Preparing your Business Views

Setting up custom calendars

Ensuring your data analysis aligns with your business timelines

PreviousScheduling refresh for Business ViewsNextTellius Engine: Comparison of In-Memory vs. Live Mode

Last updated 9 days ago

Was this helpful?

The Custom Calendar feature allows you to align your reporting and analysis with your organization's unique time structuresโ€”whether that's following international standards or your own fiscal year definitions. No more adjusting reports manuallyโ€”define how your weeks, months, and quarters work, once and for all.

You can configure:

  • Standard (ISO) Calendars: For globally accepted time structures

  • Fiscal Calendars: Tailor reporting periods to match your business cycles.

How to set up custom calendars

  1. Under Settings โ†’ Application Settings โ†’ Time Configuration โ†’ Calendars, you can find the list of already available custom calendars.
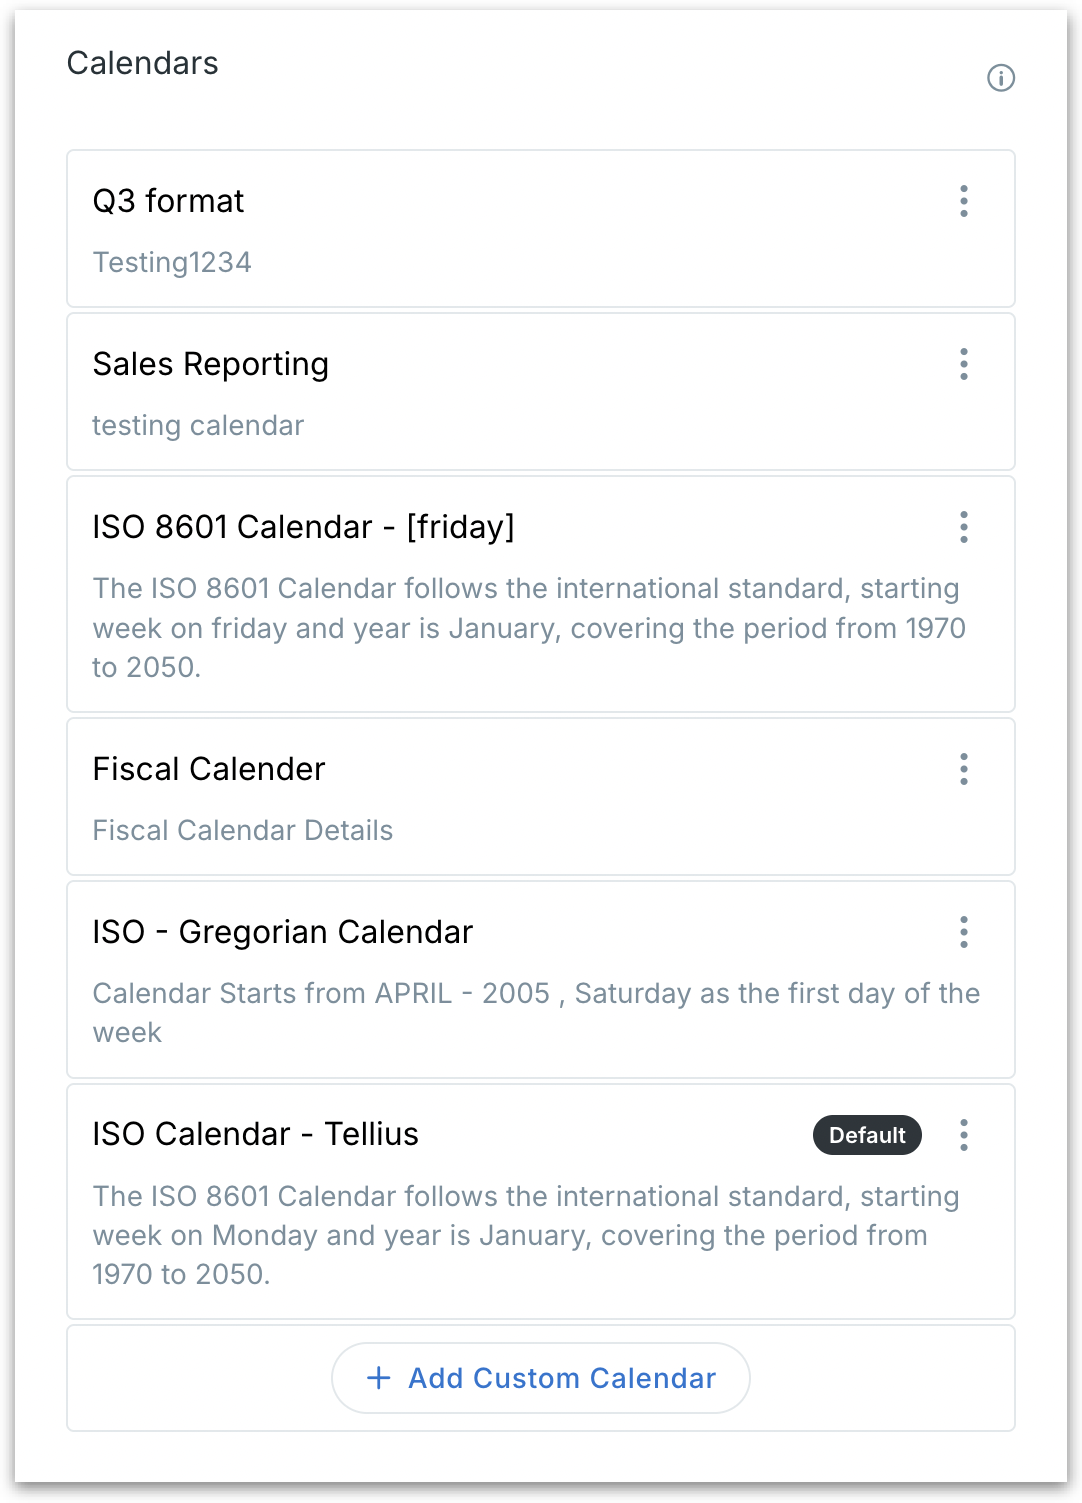
The calendar marked as "Default" in the list will automatically be applied to all new Business Views unless a different calendar is manually selected.

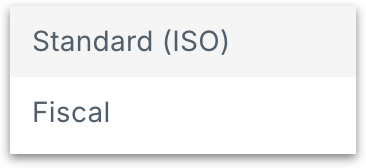
  1. Click on Add Custom Calendar and choose from "Standard" or "Fiscal" types of calendars.

    1. Standard (ISO): For businesses following ISO 8601 or Gregorian standards.

    2. Fiscal: For businesses with custom fiscal periods.
  1. If you select Standard (ISO), the following window will be displayed.
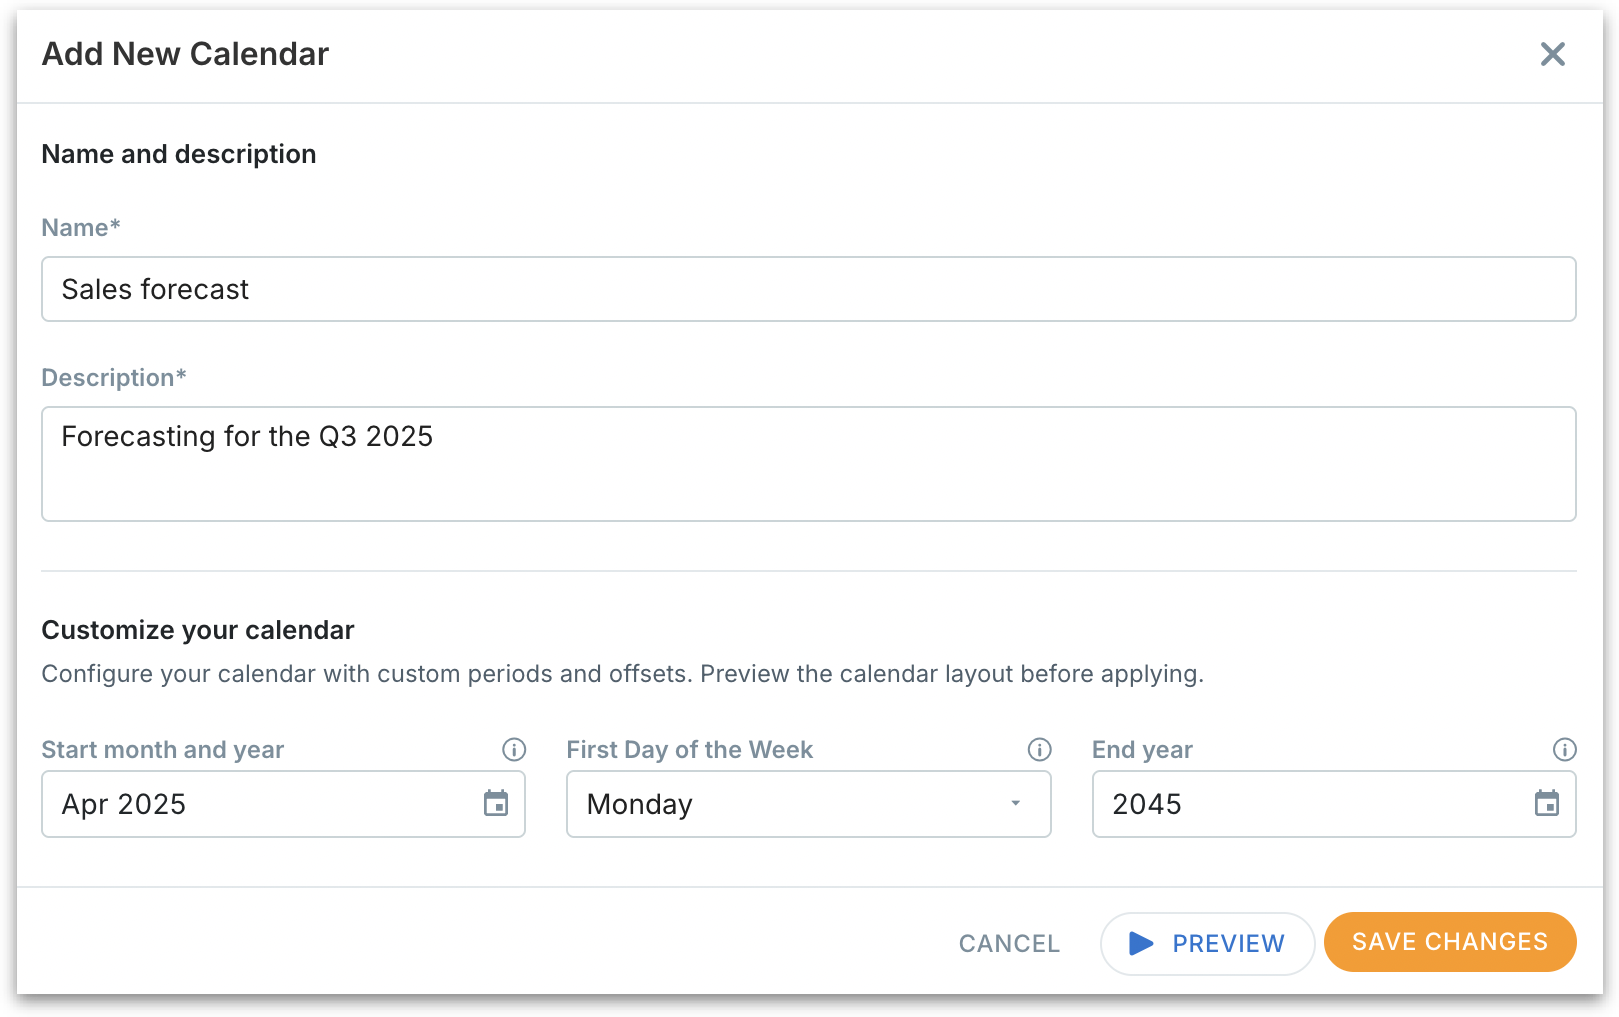
  1. Fill in the following details:

  • Name: Provide a name for the calendar (e.g., "FY2025 ISO Calendar").

  • Description: Add context about the purpose of the calendar.

  • Start month and year: Define when your calendar should begin (e.g., April 2025). This ensures all reporting aligns from this date forward.

  • First day of the week: Choose which day your weeks start (Monday, Sunday, etc.). Critical for weekly reporting accuracy.

  • End year: Set the final year this calendar should cover.

  • Preview: After filling all the above details, click on Preview. Review thoroughly before saving to ensure alignment with your reporting needs.
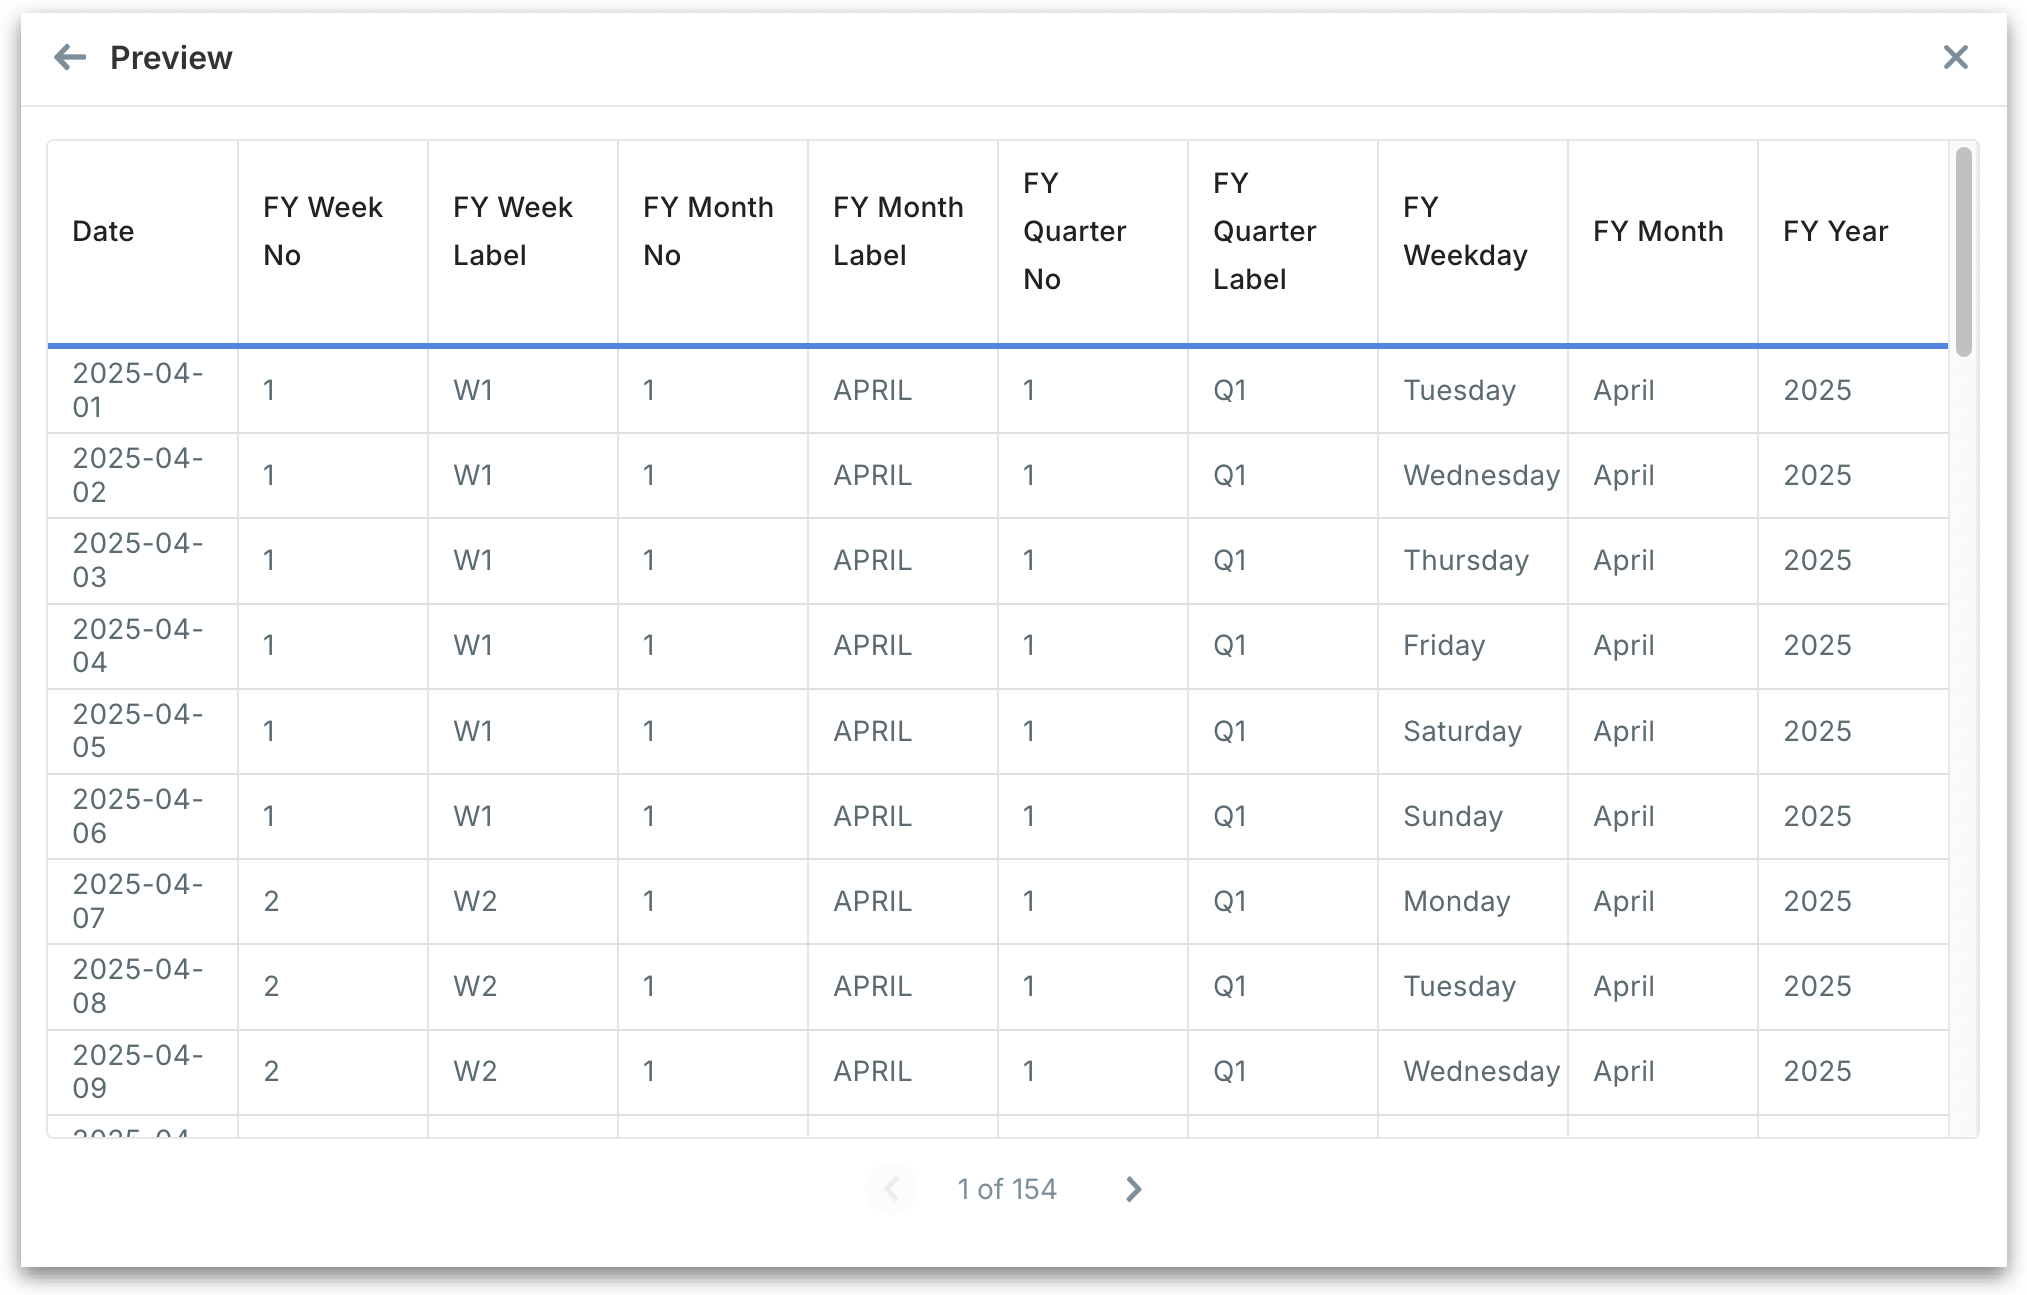
  • Review the week numbering and labels, correct month and quarter assignments and accurate day mapping.

  • After reviewing the preview, click Save Changes to activate.

  • The calendar will now appear in your list and can be set as default for Business Views (BVs) or datasets.

  1. If you select Fiscal calendar, the following window will be displayed.
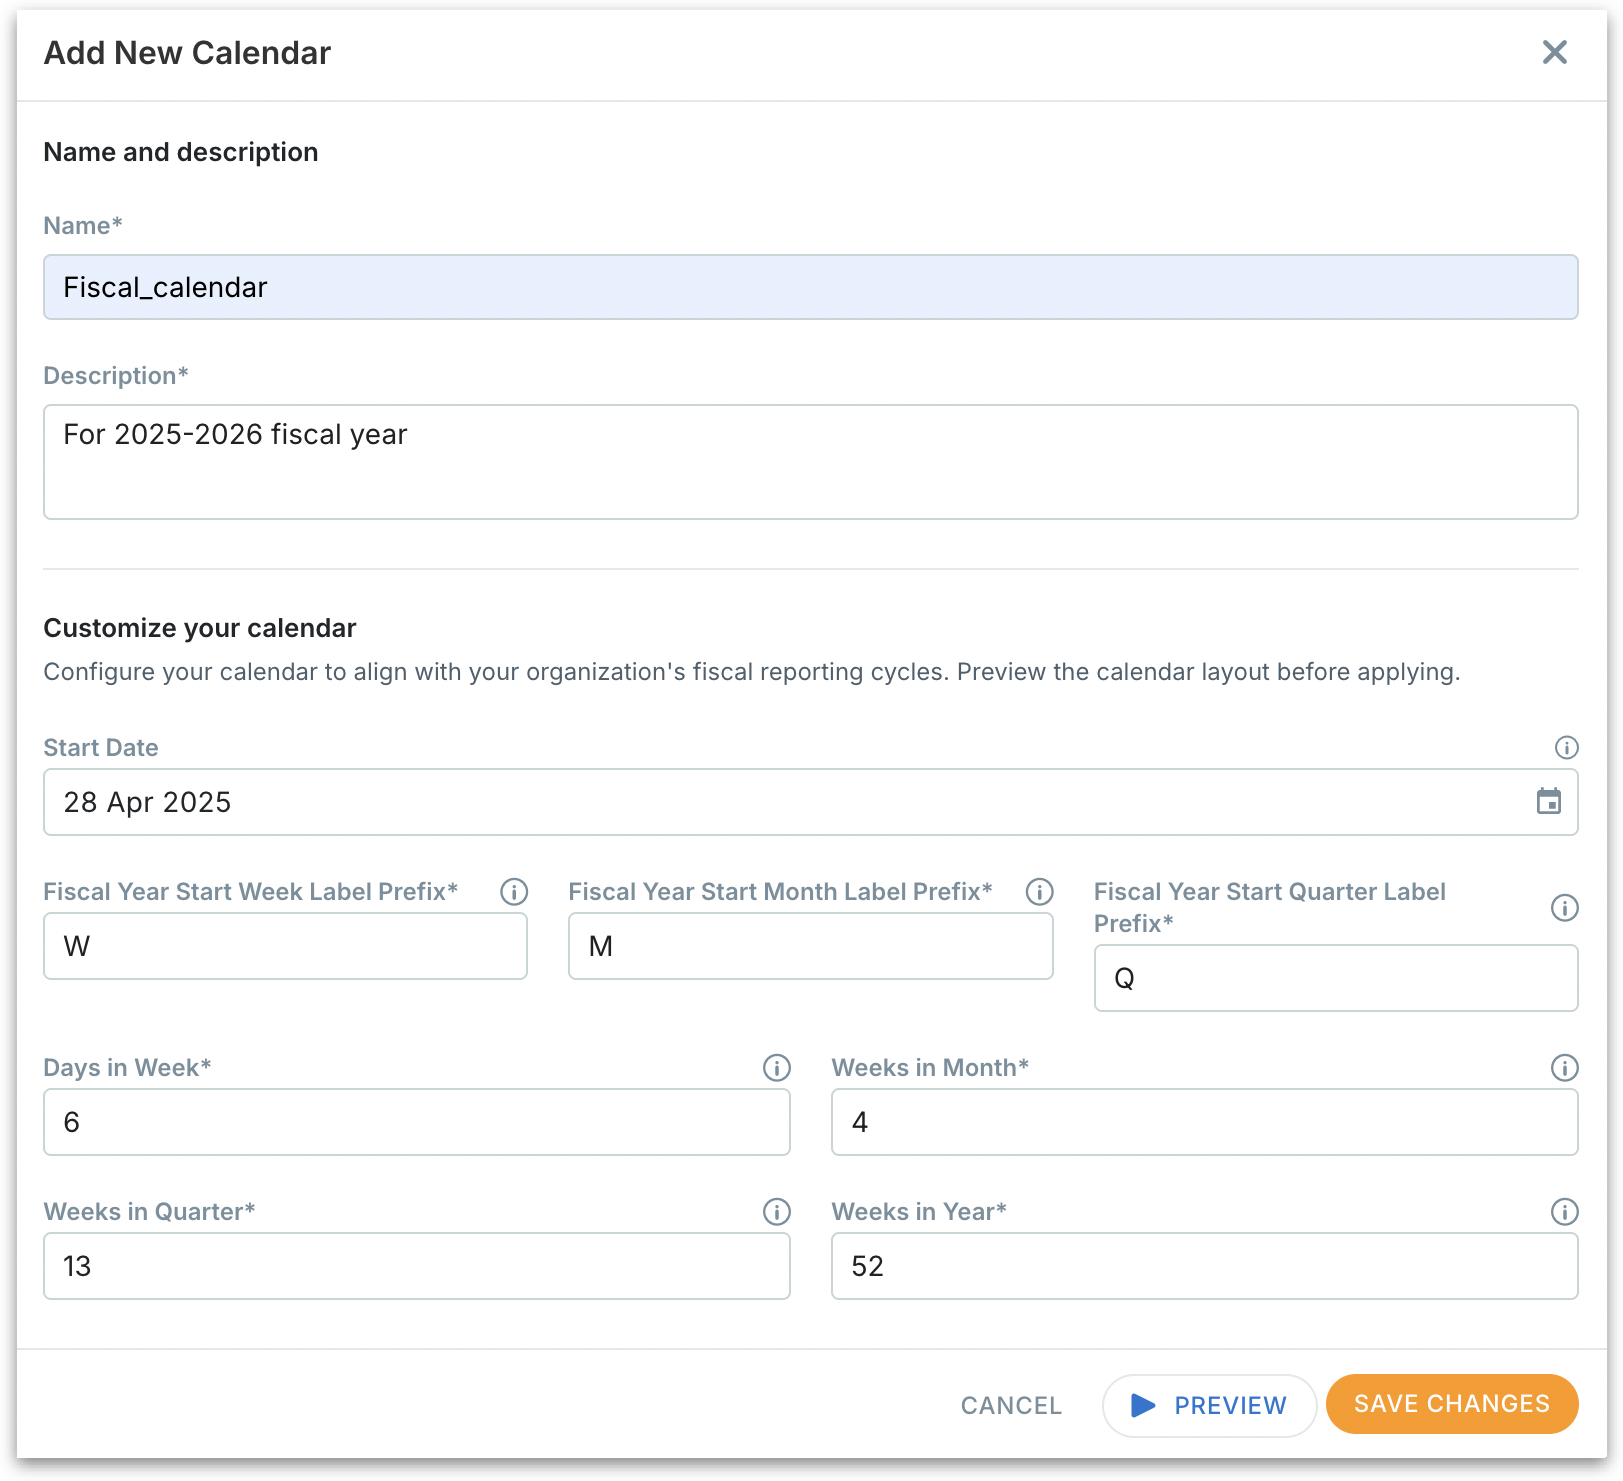
  1. Fill in the following details:

  • Name: Provide a name for the calendar (e.g., "Fiscal_Year_2025-26").

  • Description: Add context about the purpose of the calendar.

  • Start date: The exact date your fiscal year begins.

  • Fiscal year Start Week/Month/Quarter label prefix: Define how your weeks, months, and quarters should be labeled (e.g., "FY2025-W", "FY2025-M").

  • Days in week: Provide the number of days you want in a fiscal week. Useful if your business uses non-standard week lengths.

  • Weeks in month: Enter the number of weeks that make up a fiscal month. If you follow non-standard reporting cycles, like a 4-4-5 calendar (where months are structured into 4 weeks, 4 weeks, and 5 weeks) or other custom structures.

  • Weeks in quarter: Enter how many weeks make up each quarter.

  • Weeks in year: Set total fiscal year length (e.g., 52 or 53 weeks).

  • Click on Preview to validate the structure before applying.

  • After reviewing the preview, click Save Changes to activate.

  • The calendar will now appear in your list and can be set as default for Business Views (BVs).

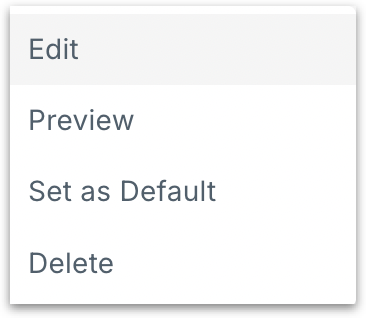
  1. Click on the three-dot kebab menu of any custom calendar where you can edit, preview, delete or set the calendar as the default one.
When to use a Standard (ISO) calendar vs Fiscal calendar

Choose a standard (ISO) calendar when:

  • You follow the ISO 8601 international standard (weeks start on Monday, first week contains January 4th).

  • Your reporting aligns with the Gregorian calendar โ€” January to December.

  • Ideal for companies without complex fiscal requirements, or for departments like marketing, sales trends, or project timelines.

Choose a fiscal calendar when:

  • Your company's financial year doesnโ€™t align with the calendar year and you follow custom reporting cycles like 4-4-5 weeks or 13-week quarters.

  • You need to align reporting with accounting practices, tax periods, or internal budgeting cycles.

  • You're in industries like Retail, Manufacturing, or FMCG, where fiscal calendars help manage seasonality and inventory better.

Applying the custom calendar

Once you've created your custom calendar, the next step is applying it to the relevant Business Views. This ensures that your reporting, analysis, and visualizations align perfectly with how your organization tracks timeโ€”whether by fiscal periods or standard weeks/months.

Custom calendars are currently supported only for In-Memory Business Views. Support for live datasets is coming soon in the upcoming releases.

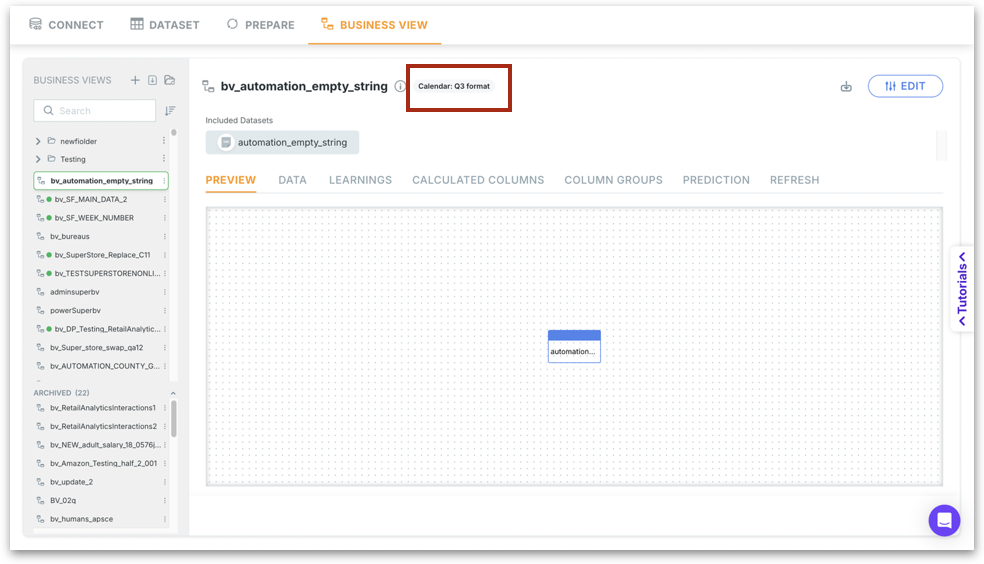
View Mode

Under Data โ†’ Business View, you can find the assigned calendar displayed right next to your Business View name. This gives you immediate visibility into which calendar governs the time logic of that BV.
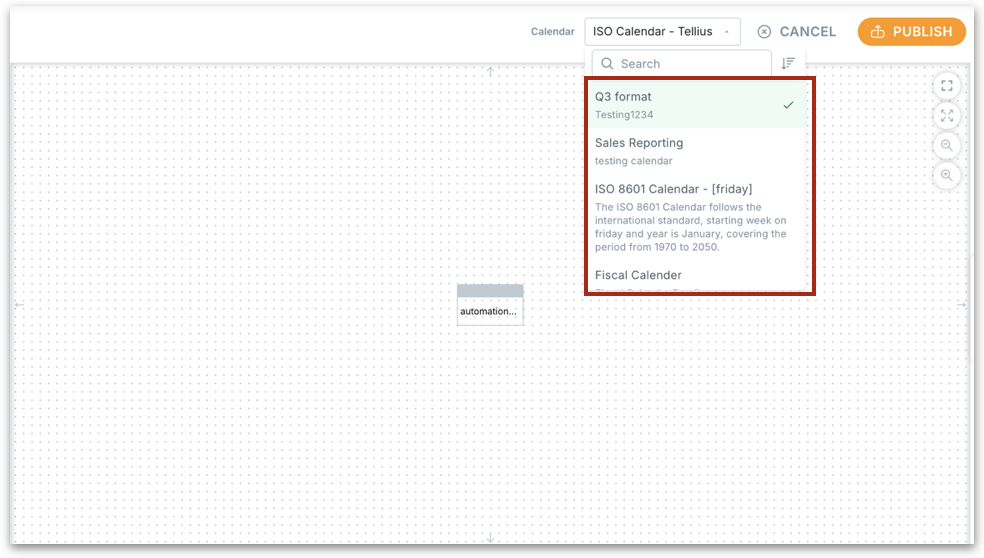
Edit Mode

In the edit mode under Data โ†’ Business View, you'll see a calendar dropdown next to your BV name.

  • Click the dropdown to select from your list of predefined calendarsโ€”including any custom fiscal or ISO calendars you've created.

  • Once selected, this calendar will govern how dates, weeks, months, and quarters are structured across all analyses using this BV.

  • Click on Publish to apply the changes.
๐Ÿ”ข
๐Ÿฅ
List of available custom calendars
Choose the type of custom calendar
Standard (ISO) calendar setup
Preview table
Fiscal calendar setup
Operations on a custom calendar
Custom calendar in View mode
Applying custom calendar in Edit mode